AWS EC2 interview questions are asked in every cloud engineering, DevOps, and solutions architect interview. Amazon Elastic Compute Cloud is the backbone of AWS – virtually every production architecture uses EC2 directly or relies on services built on top of it. Interviewers test EC2 knowledge at three levels: conceptual (what is an AMI?), operational (how do you troubleshoot an unreachable instance?), and architectural (how do you design a cost-efficient, highly available compute tier?). This guide covers 90+ AWS EC2 interview questions from beginner through advanced, with detailed answers, code examples, and comparison tables that go deeper than any other available resource.
Table of Contents
EC2 Fundamentals and Instance Types – AWS EC2 Interview Questions
What is Amazon EC2 and why is it called “Elastic”? Beginner
Amazon EC2 (Elastic Compute Cloud) is AWS’s virtual server service, delivering resizable compute capacity in the cloud. The word “Elastic” refers to the ability to scale capacity up or down in minutes based on changing demand – you can launch one instance or one thousand, and release capacity just as quickly when no longer needed. Before cloud computing, scaling required purchasing physical servers weeks or months in advance. EC2 changed this by making compute capacity as flexible as electricity – use what you need, pay only for what you consume.
EC2 instances are virtual machines running on AWS’s physical hardware using a Xen or Nitro hypervisor. The Nitro system (introduced in 2017) offloads virtualization functions to dedicated hardware, delivering near-bare-metal performance for I/O-intensive workloads. EC2 supports Linux, Windows, and macOS operating systems, and instances can be started, stopped, rebooted, or terminated via the console, CLI, SDK, or API. EC2 is billed per second for Linux instances (with a one-minute minimum) and per hour for Windows instances.
What are the EC2 instance families and what workloads does each target? Beginner
EC2 organizes instance types into families, each optimized for a different balance of compute, memory, storage, and network resources:
| Family | Examples | CPU:RAM Ratio | Best For |
|---|---|---|---|
| General Purpose | t3, t4g, m6i, m7g | Balanced | Web servers, small DBs, dev/test, microservices |
| Compute Optimized | c6i, c7g, c7a | High CPU | Batch processing, HPC, gaming servers, scientific modeling |
| Memory Optimized | r6i, r7g, x2idn, u-6tb1 | High RAM | In-memory DBs, SAP HANA, real-time analytics, Redis |
| Storage Optimized | i3, i4i, i4g, d3 | High local NVMe | NoSQL DBs, Elasticsearch, data warehousing, Kafka |
| Accelerated Computing | p4, p5, g5, inf2, trn1 | GPU / custom chip | ML training (p4/p5), rendering (g5), inference (inf2/trn1) |
| High Memory | u-6tb1, u-12tb1 | 6-24 TB RAM | In-memory databases, SAP HANA scale-up |
Instance name decoding: m7g.4xlarge = family m (general purpose), generation 7, attribute g (Graviton ARM), size 4xlarge (16 vCPU, 64 GB RAM). Attributes in instance names: i = Intel, a = AMD, g = Graviton (ARM), n = high network bandwidth, d = local NVMe SSD, z = high clock frequency.
What is the AWS Nitro System and why does it matter? Intermediate
The AWS Nitro System is a collection of hardware and software components that form the foundation for all modern EC2 instances (launched since 2017). Nitro offloads virtualization functions (networking, storage I/O, security) to dedicated hardware cards (Nitro Cards) rather than the host CPU, freeing virtually all host CPU resources for customer workloads. This delivers near-bare-metal performance – a virtualized Nitro instance performs within 1-2% of an equivalent bare-metal server for most workloads.
Nitro components: Nitro Hypervisor – lightweight hypervisor managing compute and memory virtualization; Nitro Cards – dedicated hardware for VPC networking (eliminating software-based networking overhead) and EBS I/O (NVMe protocol directly to storage); Nitro Security Chip – hardware-level security enforcing no access to customer data by AWS operators. The Nitro System enables: Bare Metal instances (i3.metal, m5.metal) where customer code runs directly on hardware with no virtualization overhead; 100 Gbps network bandwidth; encrypted EBS volumes with no performance penalty; and the latest instance generation features.
What is the difference between a t3 and an m6i instance? Beginner
Both are general-purpose instances but with a critical architectural difference: t3 (burstable): designed for workloads with a variable CPU usage pattern – low baseline with occasional spikes. t3 instances earn CPU credits during periods of low utilization and spend credits during bursts above baseline. A t3.medium has a baseline of 20% of one vCPU but can burst to 100% of two vCPUs while credits last. When credits are exhausted, CPU is throttled to the baseline. Excellent for development instances, low-traffic websites, and batch jobs with intermittent spikes. Cost: t3.medium is ~$0.0416/hour (on-demand).
m6i (fixed performance): delivers consistent CPU performance at all times with no credit system. A m6i.large always provides its full 2 vCPU capacity regardless of utilization history. Best for production workloads requiring predictable performance – application servers, medium databases, container hosts where CPU throttling during high-traffic events is unacceptable. Cost: m6i.large is ~$0.096/hour. T3 Unlimited mode allows sustained bursting above baseline at a per-CPU-credit charge, eliminating throttling but potentially exceeding On-Demand instance cost under sustained load.
What are EC2 Bare Metal instances? Intermediate
EC2 Bare Metal instances (e.g., i3.metal, m5.metal, c5.metal) give applications direct access to the underlying physical server hardware without a hypervisor layer between the application and hardware. This is needed for: (1) workloads requiring access to hardware features not exposed through virtualization (hardware performance counters, custom BIOS configurations); (2) licensing requirements that mandate bare-metal infrastructure; (3) running your own hypervisor on top of EC2 (e.g., VMware Cloud on AWS uses bare metal instances to run the VMware hypervisor); (4) maximum performance benchmarking.
Despite being “bare metal”, AWS still provides the Nitro Security Chip for hardware-level isolation and the Nitro Card for networking and storage, so you still get VPC networking, EBS access, and all AWS service integration. Bare metal instances follow the same naming convention as their virtualized counterparts – i3.metal has the same hardware as i3.16xlarge but with no hypervisor overhead.
What is an EC2 instance lifecycle? Beginner
EC2 instances move through several states from launch to termination:
Pending: the instance is being prepared after launch – hardware is being allocated, the AMI is being copied, and networking is being configured. No charges yet. Running: the instance is fully operational and serving traffic. Compute charges accrue. Stopping: the OS is shutting down gracefully. Brief transitional state. Stopped: the instance is shut down. No compute charges (EBS storage is still charged). Can be restarted; instance is likely moved to new hardware on restart. Shutting-down: the instance is being terminated. Brief transitional state. Terminated: instance is permanently deleted. Cannot be recovered. No more charges (root EBS volume deleted by default). Hibernating/Hibernated: RAM contents saved to EBS root volume; instance effectively paused. Useful for preserving application state and resuming quickly.
Note: stopped instances can be moved to new hardware on restart (useful when experiencing hardware issues), receive a new private IP if not using a static assignment, and get a new public IP (unless an Elastic IP is attached). Instance ID and associated EBS volumes remain unchanged through stop/start cycles.
What is EC2 Hibernate and when do you use it? Intermediate
EC2 Hibernate saves the instance’s in-memory (RAM) state to its EBS root volume and stops the instance. When the instance is started again, the RAM contents are restored and the instance resumes exactly where it left off – applications continue from the same state, open TCP connections may resume (if they have not timed out), and processes that were running are still in memory. Boot time from hibernate is much faster than a full cold start because the OS and applications do not need to reinitialize.
Requirements for Hibernate: must be enabled at launch time (cannot enable on an existing running instance); EBS root volume must be large enough to store RAM contents (root volume size >= instance RAM size); root volume must be encrypted; instances can hibernate for up to 60 days. Best use cases: long-running processes you want to pause without losing state (ML preprocessing, dev environments you pause overnight), applications with slow startup times that benefit from preserving initialization state, and pre-warming application caches that take minutes to fill. Not available for all instance types or AMIs.
What is the difference between an EC2 instance and a container? Beginner
An EC2 instance is a full virtual machine with its own OS kernel, memory, and CPU allocation. Startup time is 1-5 minutes. Each instance requires OS maintenance (patching, monitoring). High isolation – one VM cannot access another VM’s memory or CPU even on the same physical host. Resource overhead: a minimum viable EC2 instance consumes ~200-500 MB of RAM for the OS alone.
A container (Docker) packages only the application and its dependencies without a full OS kernel – containers share the host kernel. Startup time is seconds. Multiple containers run on one EC2 instance, sharing its OS kernel but isolated at the process level (namespaces, cgroups). Containers are more resource-efficient (more applications per host) but have weaker isolation than VMs. On AWS: run containers on EC2 via ECS or EKS, or use Fargate (serverless containers) to avoid managing EC2 instances entirely. A common architecture: ECS tasks (containers) running on EC2 instances provides both containerization benefits (fast deployment, isolation, portability) and EC2 benefits (persistent instances for stateful workloads, cost predictability).
What are EC2 Dedicated Instances vs Dedicated Hosts? Intermediate
Dedicated Instances run on hardware dedicated to a single AWS account – no hardware sharing with other AWS customers’ instances. The specific physical host may change between stop/start cycles. Charged per instance with a per-region fee. Used for compliance requirements mandating single-tenant hardware without needing hardware-level control.
Dedicated Hosts give you control over a specific physical server. You see the physical core count and can place specific instances on specific hosts. Host affinity ensures instances restart on the same host after a stop/start. Used for: software licenses tied to a specific server’s hardware (Oracle per-socket or per-core licensing, Windows Server per-core licensing) where you must demonstrate control over which physical server your workload runs on, and for compliance frameworks requiring host-level isolation with visibility into the underlying hardware. Dedicated Hosts can be purchased On-Demand or as Reserved (1- or 3-year terms, large discount).
What is an EC2 Capacity Reservation and when do you need one? Intermediate
An EC2 Capacity Reservation guarantees that a specific amount of EC2 capacity (instance type, AZ, platform) is available in your account whenever you need it. Unlike Reserved Instances (which are billing discounts), Capacity Reservations actually hold compute capacity – AWS sets aside physical hardware for you even if you are not using it. You are charged at On-Demand rates for the reserved capacity whether or not instances are running in the reservation.
Use cases: business-critical applications that must be able to scale during a disaster recovery event or traffic spike, even if the region is under capacity pressure; compliance requirements guaranteeing compute availability for a specific workload; ensuring capacity in a specific AZ for applications sensitive to AZ selection. Capacity Reservations can be combined with Regional Reserved Instances or Savings Plans to get the billing discount while holding the capacity guarantee. Open reservations accept any matching instance; targeted reservations require explicit assignment at launch.
Pricing Models and Cost Optimization – AWS EC2 Interview Questions
Explain all EC2 pricing models with their trade-offs. Beginner
On-Demand: pay per second (Linux) or per hour (Windows) with no commitment. Highest per-unit price. No upfront cost. Ideal for unpredictable workloads, short-term experiments, and new applications where usage patterns are unknown. Flexibility comes at a premium – On-Demand is the baseline against which all other models offer discounts.
Reserved Instances (RIs): 1- or 3-year commitment to a specific instance type in a specific region. Payment options: No Upfront (monthly), Partial Upfront (some now, rest monthly), or All Upfront (largest discount). Discounts of 40-72% vs On-Demand. Standard RIs cannot change instance family; Convertible RIs allow changes to instance family, OS, tenancy at ~54% discount. Standard RIs can be sold on the AWS Marketplace if your needs change. Best for: production databases, application servers, and any steady-state workload running 24/7.
Spot Instances: bid on spare EC2 capacity. AWS publishes a Spot price that fluctuates based on supply/demand. Discounts up to 90% vs On-Demand. AWS reclaims instances with a 2-minute warning when Spot capacity is needed. Best for: batch jobs, CI/CD build agents, data processing, rendering, ML training – workloads that are fault-tolerant and can be interrupted and resumed. Never use Spot for primary production databases or stateful services that cannot tolerate interruption.
Savings Plans: commit to a consistent amount of compute usage ($/hour) for 1 or 3 years. Two types: Compute Savings Plans (apply to EC2 any family/region/OS, Lambda, Fargate – up to 66% discount) and EC2 Instance Savings Plans (specific family in a region – up to 72%, same as Standard RI). Savings Plans are simpler than RIs because you commit in dollar terms, not instance terms.
How do Spot Instances work technically and what is a Spot Interruption? Intermediate
Spot Instances use spare EC2 capacity that AWS has available. You request a Spot Instance by specifying a maximum price you are willing to pay per hour (or accepting the current Spot price). The current Spot price varies by instance type and AZ based on supply and demand. When the current Spot price is below your maximum price and capacity is available, your instance runs.
A Spot Interruption occurs when AWS needs the capacity back (another customer needs On-Demand capacity, or demand spikes). AWS sends a 2-minute warning via the instance metadata at http://169.254.169.254/latest/meta-data/spot/interruption-action and via CloudWatch Events/EventBridge. Your application has 2 minutes to checkpoint state, drain connections, and terminate gracefully. Interruption actions: terminate (default), stop, or hibernate (must be configured at launch). Design patterns for Spot resilience: use EC2 Auto Scaling with mixed instance types and purchase options (some On-Demand for minimum capacity, Spot for burst capacity); use Spot Fleet with diversification across multiple instance types and AZs to reduce simultaneous interruptions; use Spot Instance Advisor to see historical interruption rates by type and AZ and choose low-interruption types.
What is a Spot Fleet and how does it differ from a Spot Instance request? Intermediate
A single Spot Instance request targets one instance type in one AZ. If capacity is unavailable or the price exceeds your maximum, the request fails. A Spot Fleet is a collection of Spot Instances (and optionally On-Demand Instances) that AWS launches across multiple instance types and AZs to meet a target capacity. You define a fleet with a set of “launch specifications” – multiple combinations of instance type, AZ, and AMI – and Spot Fleet automatically selects the combination that meets your target capacity at the lowest price.
Fleet strategies: lowestPrice – allocate from the cheapest pool first (maximize savings, higher interruption risk if that pool runs low). diversified – distribute instances across all specified pools (lower interruption risk, higher average price). capacityOptimized – launch from pools with the most available capacity (AWS’s recommended strategy, best interruption resilience). priceCapacityOptimized: balance lowest price with capacity availability. For production-grade Spot architectures, capacityOptimized or priceCapacityOptimized with diversification across instance families is the recommended approach.
What is the difference between Standard and Convertible Reserved Instances? Intermediate
Standard Reserved Instances: locked to a specific instance family, generation, size, OS, and tenancy in a specific region. Cannot change these attributes after purchase. Offer the highest discount (up to 72% over On-Demand). Can be sold on the Reserved Instance Marketplace if your needs change (e.g., you migrate from m5 to m6i and want to sell your remaining m5 RIs). Can be modified within the same family (e.g., two m5.xlarge RIs can be merged into one m5.2xlarge RI).
Convertible Reserved Instances: can be exchanged for different instance families, sizes, operating systems, or tenancy at any time during the term, as long as the new RI is of equal or greater value. Smaller discount (~54% over On-Demand) in exchange for flexibility. Cannot be sold on the Marketplace. Best when you anticipate migrating to newer instance generations or changing workload requirements over the 1- or 3-year term. Example: purchase a Convertible RI for m5.2xlarge today, then exchange it for an m7g.2xlarge (Graviton) when you decide to migrate, without financial penalty.
How do you calculate the right mix of Reserved Instances and On-Demand for a workload? Advanced
The framework: analyze at least 30 days of CloudWatch/Cost Explorer usage data to identify the stable baseline vs peak demand pattern. Reserve at the minimum sustained usage level (the floor) and use On-Demand or Spot for variable demand above that floor.
Example: a web application that always has at least 4 instances running but scales to 12 at peak. Purchase 4 Reserved Instances (or Savings Plans) for the baseline (guaranteed 40-72% discount). Scale 5-12 instances using On-Demand or Spot. This avoids over-buying RIs (purchasing 12 RIs would mean 8 idle RIs overnight, wasting the commitment benefit). AWS Cost Explorer’s “Reserved Instance Recommendations” runs this analysis automatically – it shows the best RI purchase quantity and estimated monthly savings given your recent usage. Revisit RI coverage quarterly as workloads evolve. The target RI coverage ratio for steady-state workloads is typically 70-80%: high enough to get notable savings, low enough to retain flexibility.
What is EC2 Savings Plans and how do they compare to Reserved Instances? Intermediate
Savings Plans commit to a specific hourly dollar spend on compute for 1 or 3 years. The discount (up to 66% for Compute Savings Plans, 72% for EC2 Instance Savings Plans) applies automatically to any matching usage. Two types:
EC2 Instance Savings Plans: apply to a specific EC2 instance family in a specific region (e.g., m-family in us-east-1). Same discount as Standard RIs. More flexible than RIs within the family (any size, OS, tenancy). Less flexible than Convertible RIs (cannot change family or region).
Compute Savings Plans: apply to any EC2 usage regardless of family, region, OS, or tenancy, AND to AWS Fargate and Lambda usage. Maximum flexibility. Discount up to 66%. Best for: organizations using multiple instance families, migrating between generations, using Fargate and Lambda alongside EC2, or operating in multiple regions. Savings Plans are generally preferred over RIs for new commitments because they are simpler (dollar commitment, not instance commitment), automatically apply across services, and eliminate the management overhead of modifying or selling RIs.
What tools does AWS provide to identify EC2 cost optimization opportunities? Intermediate
AWS Compute Optimizer: analyzes 14 days of EC2 instance utilization (CloudWatch metrics) and recommends the right-sized instance type. It will recommend downsizing an m5.4xlarge running at 10% average CPU to a t3.large, potentially saving 80%. Also recommends EC2 Auto Scaling Groups, EBS volumes, Lambda functions, and ECS tasks. Free service with optional enhanced recommendations (uses more than 14 days of data and includes memory metrics if CloudWatch Agent is installed).
AWS Cost Explorer: shows Reserved Instance coverage, utilization reports (what % of your running hours are covered by RIs/Savings Plans), and RI/Savings Plan purchase recommendations. AWS Trusted Advisor: flags low-utilization EC2 instances (<10% average CPU over 14 days), idle load balancers, unassociated Elastic IPs, and underutilized EBS volumes. AWS Cost and Usage Report (CUR): the most granular billing data, queryable via Athena, enabling custom analysis down to the resource-hour level. The combination of Compute Optimizer (what to right-size) + Cost Explorer (what to reserve) provides the complete picture for EC2 cost optimization.
What is an EC2 Spot block and when was it discontinued? Advanced
EC2 Spot Blocks (formerly called “Defined Duration Spot Instances”) allowed you to request Spot capacity with a specific duration (1-6 hours) guaranteed with no interruption during that window. This was useful for batch jobs with a known completion time shorter than 6 hours. AWS announced in 2021 that new Spot block requests would no longer be fulfilled, and Spot blocks were effectively discontinued.
The replacement strategy for jobs requiring uninterrupted compute: (1) Design jobs for checkpointing – save progress to S3 every few minutes so a Spot interruption only loses a few minutes of work, not the full job. (2) Use Spot Fleet with capacityOptimized diversification across many instance types and AZs to minimize simultaneous interruption probability. (3) Use AWS Batch with Spot – Batch automatically handles Spot interruptions by checkpointing and rescheduling affected jobs. (4) For truly interruption-intolerant jobs under 15 minutes, Lambda may be a better fit than Spot. The Spot interruption rate for well-diversified fleets using capacityOptimized is typically below 5% in practice.
How does EC2 Auto Scaling Group pricing work? Beginner
Auto Scaling Groups themselves are free – you pay only for the EC2 instances running within the group. The ASG manages the lifecycle of instances but does not add a cost layer. You are charged standard EC2 rates (On-Demand, Spot, or Reserved – whichever the instance uses) for each running instance, per second for Linux or per hour for Windows, from the moment it enters the Running state until it is terminated.
For mixed instance type ASGs (a combination of On-Demand and Spot), you specify the minimum On-Demand capacity (for baseline availability) and the Spot capacity above that. Each instance type within the ASG is independently priced. When an ASG launches an On-Demand instance from a Reserved Instance or Savings Plan, the discount applies automatically. The ASG does not need to know about your reservations – discount application is automatic based on the instance type running in the account. Cost modeling an ASG: (baseline_instances x RI_rate) + (average_spot_instances x spot_rate) + (peak_on_demand_overage x on_demand_rate).
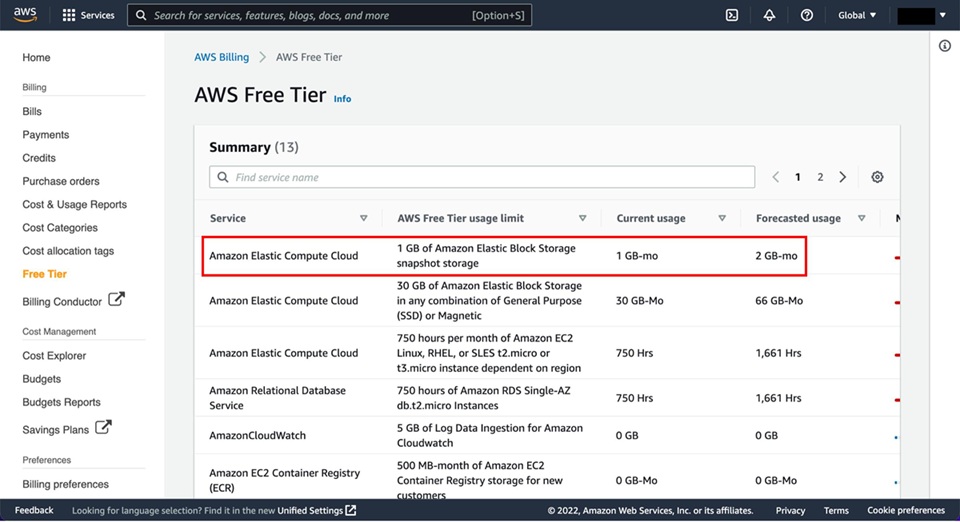
What is the EC2 Free Tier and what are its limits? Beginner
The EC2 Free Tier provides 750 hours per month of t2.micro or t3.micro instance usage on Linux and Windows, for the first 12 months after AWS account creation. 750 hours is exactly enough to run one t2.micro or t3.micro continuously for the entire month (24 hours x 31 days = 744 hours). Running two micro instances simultaneously consumes the 750 hours in ~15 days.
Free tier also includes: 30 GB of EBS storage (magnetic or gp2/gp3), 2 million I/O operations, 1 GB EBS snapshot storage, and 100 GB of bandwidth out to the internet. What is NOT free: data transfer between AZs (even within the free tier), Elastic IP addresses not associated with running instances, and any instance type larger than micro. The free tier resets monthly and does not carry over. After 12 months, all usage is billed at standard On-Demand rates. Enable AWS Budgets with a $0 alert immediately after account creation to avoid unexpected charges when free tier expires or is exceeded.
Storage – EBS, EFS, and Instance Store – AWS EC2 Interview Questions
What are EBS volume types and when do you use each? Intermediate
EBS offers four volume types covering SSD and HDD tiers:
| Volume Type | Max IOPS | Max Throughput | Use Case | Boot Volume |
|---|---|---|---|---|
| gp3 (General SSD) | 16,000 | 1,000 MB/s | Default root volume, web servers, dev/test | Yes |
| gp2 (General SSD, legacy) | 16,000 | 250 MB/s | Legacy workloads – migrate to gp3 for same price, better performance | Yes |
| io2 Block Express (Provisioned IOPS) | 256,000 | 4,000 MB/s | Mission-critical databases (Oracle, SAP HANA) | Yes |
| io1 (Provisioned IOPS, legacy) | 64,000 | 1,000 MB/s | Legacy high-IOPS databases – migrate to io2 | Yes |
| st1 (Throughput HDD) | 500 | 500 MB/s | Big data, Kafka log storage, sequential reads | No |
| sc1 (Cold HDD) | 250 | 250 MB/s | Infrequently accessed archives, lowest cost | No |
gp3 is the default and preferred choice for most workloads. Unlike gp2 (where IOPS scale with size: 3 IOPS/GB, capped at 16,000), gp3 allows independently setting IOPS (up to 16,000) and throughput (up to 1,000 MB/s) regardless of volume size – a 1 GB gp3 can have 16,000 IOPS if needed. gp3 is also 20% cheaper per GB than gp2. Migrate all gp2 volumes to gp3 for cost savings and better performance configurability.
What is the difference between EBS and Instance Store? Beginner
EBS (Elastic Block Store): network-attached block storage. Data persists independently of the EC2 instance lifecycle – stopping or terminating an instance does not destroy EBS data (unless DeleteOnTermination is enabled on the root volume). EBS volumes can be detached from one instance and attached to another. Backed up via snapshots to S3. Supports encryption. Maximum size: 64 TB per volume. Network latency: typically sub-millisecond but slightly higher than local disk. Performance limited by network bandwidth of the instance.
Instance Store (Ephemeral Storage): physical disks directly attached to the host server. No network latency – NVMe drives directly on the PCIe bus. Extremely high throughput (i4i.32xlarge has 60 TB NVMe SSD delivering 1.25 million random read IOPS). Critical limitation: data is permanently lost when the instance stops, hibernates, terminates, or the host fails. No snapshots or backup capability. Use for: temporary caches (Memcached data that can be rebuilt), scratch space for large computation (Hadoop intermediate data, video transcoding temp files), and high-performance buffers. Never use Instance Store as your only copy of important data.
How do EBS snapshots work and how do you manage their cost? Intermediate
EBS snapshots are point-in-time backups of EBS volumes stored in S3 (you cannot see the underlying S3 objects; AWS manages them). The first snapshot is a full copy of the volume. Subsequent snapshots are incremental – only blocks that changed since the last snapshot are stored. However, each snapshot is independently usable (you can restore from any snapshot without needing previous snapshots in the chain). AWS handles the incremental chain management transparently.
Snapshot creation: aws ec2 create-snapshot --volume-id vol-0abc123 --description "MyDB backup". For application-consistent snapshots (especially databases), use AWS Backup or EBS Multi-Volume Crash-Consistent Snapshots (takes all specified volumes simultaneously). Cost: $0.05/GB-month for snapshot data stored. Cost management strategies: (1) Enable Amazon Data Lifecycle Manager (DLM) policies to create snapshots on a schedule and automatically delete old ones (e.g., keep 7 daily, 4 weekly, 12 monthly). (2) Use EBS Snapshot Archive for rarely accessed snapshots (75% cost reduction; 24-72 hour restore time). (3) Delete unused snapshots – they are frequently forgotten and accumulate over time. (4) Copy snapshots to Glacier via AWS Backup for long-term retention at lower cost.
What is EBS Multi-Attach and when do you use it? Advanced
EBS Multi-Attach allows a single io1 or io2 Provisioned IOPS volume to be attached to multiple EC2 instances simultaneously (up to 16 instances in the same AZ). This is the exception to the standard rule that an EBS volume can only be attached to one instance. All attached instances have full read/write access to the volume simultaneously.
Critically: Multi-Attach requires that the application and file system support concurrent access. Standard file systems like ext4 and XFS are not designed for concurrent multi-host writes and will corrupt data if both instances write simultaneously. Multi-Attach is designed for: clustered databases (Oracle RAC, MSCS) and distributed applications that implement their own I/O coordination and locking at the application level (they handle write conflicts through cluster software, not the file system). Do NOT use Multi-Attach with standard file systems like ext4 – use EFS instead if you need a shared file system across multiple instances. Multi-Attach is supported only in a single AZ and the volume must be of type io1 or io2.
How does EBS encryption work and what is its performance impact? Intermediate
EBS encryption uses AES-256 encryption at rest. Encryption is managed transparently: data is encrypted before it is written to the volume and decrypted when read by the EC2 instance. The encryption and decryption happen on the host hardware (Nitro cards) rather than consuming EC2 CPU cycles, so the performance impact of EBS encryption is negligible on Nitro-based instances (virtually 0% throughput and latency overhead).
Encryption can be enabled at volume creation (not retroactively on an existing unencrypted volume). To encrypt an existing unencrypted volume: create a snapshot, create an encrypted copy of the snapshot (using aws ec2 copy-snapshot with –encrypted flag), create a new volume from the encrypted snapshot, detach the old volume, attach the new encrypted volume. Encryption keys: the default is the AWS-managed EBS key (aws/ebs); for compliance requiring customer key control, specify a customer-managed KMS key. Account-level default encryption: in EC2 console under Settings, enable “Always encrypt new EBS volumes” to ensure every new volume is encrypted by default, catching cases where developers forget to check the encryption box.
What is the EBS volume resize (elastic volumes) process? Intermediate
AWS Elastic Volumes allows resizing EBS volumes, changing volume type, and adjusting IOPS/throughput while the volume is in use and attached to a running EC2 instance – no detachment or downtime required. After the volume is modified in AWS, you must extend the file system inside the OS to use the new space.
# Step 1: Modify the EBS volume via AWS CLI
aws ec2 modify-volume --volume-id vol-0abc123 --size 200

# Step 2: Wait for modification state to be "optimizing" or "completed"
aws ec2 describe-volumes-modifications --volume-id vol-0abc123

# Step 3: Extend the partition (if the volume has a partition)
sudo growpart /dev/nvme0n1 1

# Step 4: Resize the filesystem (ext4)
sudo resize2fs /dev/nvme0n1p1

# Step 4 alternative: Resize the filesystem (xfs)
sudo xfs_growfs /
Constraints: you can only increase volume size, never decrease it. Modification cooldown: after modifying a volume, you must wait at least 6 hours before modifying it again. Changing from gp2 to gp3 (or any other type) follows the same process but also requires the file system resize if throughput changes require it.
What is Amazon EFS and how does it compare to EBS? Intermediate
Amazon EFS (Elastic File System) is a fully managed NFS (Network File System) that can be mounted concurrently by multiple EC2 instances across multiple Availability Zones. Unlike EBS (one volume per instance, single AZ), EFS grows and shrinks automatically without provisioning, and any number of instances can read and write simultaneously.
Key differences from EBS: EFS is shared (many instances simultaneously); EBS is dedicated (one instance at a time). EFS uses NFS protocol (mounts via mount -t nfs4); EBS uses block storage protocols. EFS scales from bytes to petabytes automatically; EBS requires manual resizing. EFS is more expensive (~$0.30/GB-month for Standard vs ~$0.08/GB-month for gp3). EFS performance modes: General Purpose (latency-sensitive) and Max I/O (higher throughput, higher latency). EFS throughput modes: Bursting (throughput scales with storage size), Provisioned (fixed throughput regardless of size), and Elastic (automatically scales to workload demand). Use EFS for: web farms sharing a content directory, containers sharing data across hosts, ML training data accessed by multiple nodes, and home directories. Use EBS for single-instance high-performance block storage (databases, OS volumes).
How do you take an application-consistent snapshot of a database on EC2? Advanced
A crash-consistent snapshot (taken while the database is running without any preparation) may capture data mid-write, leading to a database that requires crash recovery on restore. An application-consistent snapshot ensures the database has flushed all pending writes to disk before the snapshot is taken, producing a clean, immediately usable backup.
# MySQL InnoDB application-consistent snapshot (recommended approach)
# Step 1: Open a consistent snapshot transaction (InnoDB MVCC, no global lock)
mysql -u root -p -e "START TRANSACTION WITH CONSISTENT SNAPSHOT;"

# Step 2: Record the binary log position for point-in-time recovery reference
mysql -u root -p -e "SHOW MASTER STATUS;"

# Step 3: Create the EBS snapshot while the MVCC snapshot is held
aws ec2 create-snapshot --volume-id vol-0abc123 --description "MySQL consistent backup"

# Step 4: Close the MySQL session (transaction ends, no explicit lock release needed)
# For MyISAM tables, use FLUSH TABLES WITH READ LOCK / SHOW MASTER STATUS / snapshot / FLUSH TABLES
For production databases, use AWS Systems Manager Automation documents that coordinate the lock/snapshot/enable sequence, or use native database backup features (MySQL mysqldump with –single-transaction for InnoDB, or Amazon RDS automated backups which handle this automatically). AWS Backup integrates with application-consistent snapshots via VSS (Volume Shadow Copy Service) for Windows workloads and Pre/Post scripts for Linux.
What is EBS Throughput vs IOPS and how do you choose which matters for your workload? Intermediate
IOPS (Input/Output Operations Per Second): the number of read or write operations per second, regardless of size. IOPS is the critical metric for random I/O workloads – databases reading small rows scattered across the volume (4-16 KB block sizes). An OLTP database doing 10,000 small random reads/second needs high IOPS.
Throughput (MB/s): the volume of data transferred per second. Throughput is the critical metric for sequential I/O workloads – big data processing, video streaming, Kafka log writes, where large sequential blocks (64-1024 KB) are read or written continuously. A Hadoop node sequentially reading 200 MB of data blocks needs high throughput, not high IOPS.
Relationship: IOPS x block size = throughput. A volume doing 1,000 IOPS with 64 KB blocks delivers 64 MB/s throughput; the same 1,000 IOPS with 4 KB blocks delivers only 4 MB/s. For most relational databases (MySQL, PostgreSQL): optimize IOPS (random I/O, small blocks). For data warehouses and big data: optimize throughput (sequential I/O, large blocks). gp3 lets you independently set both; io2 provides maximum IOPS for latency-sensitive databases; st1 provides maximum throughput for streaming sequential workloads.
How do you migrate data from one EBS volume to another? Intermediate
Several approaches depending on the migration goal (encryption change, type change, region/AZ migration, or size increase):
Snapshot and restore: create a snapshot of the source volume, create a new volume from the snapshot (specifying the new type, size, or encryption). Stop the instance, detach old volume, attach new volume (as the same device name, e.g., /dev/xvda for root), start the instance. This is the only way to change AZ or region. Cross-region: copy the snapshot to the target region first, then create the volume there.
Elastic Volumes modification: for type or size changes on an attached volume, use Modify Volume in-place (no downtime). After modification, resize the file system in the OS. Not applicable for AZ or region changes.
rsync for data migration: attach both volumes simultaneously (e.g., old volume as /dev/xvdf, new volume as /dev/xvdg), mount both, rsync data from one to the other. Then unmount, detach old, and use new. Allows migration without taking the source volume offline, useful for large volumes where downtime must be minimized.
Networking – Security Groups, EIPs, ENIs, and Placement Groups – AWS EC2 Interview Questions
What is an Elastic Network Interface (ENI) and when do you need multiple ENIs? Intermediate
An Elastic Network Interface (ENI) is a virtual network card attached to an EC2 instance. Every instance has at least one primary ENI (eth0) that cannot be detached. Additional ENIs can be attached and detached while the instance is running. Each ENI has its own private IP address, optional public IP, security groups, MAC address, and source/destination check setting.
Use cases for multiple ENIs: (1) Management network separation: one ENI for application traffic (on a production subnet), a second ENI for management/SSH traffic (on a separate management subnet with tighter security group rules). (2) Network appliances: firewalls and load balancers that need to be on multiple subnets simultaneously. (3) Dual-homing: connecting an EC2 instance to two different VPCs via separate ENIs for connectivity between accounts. (4) License compliance: some software licenses are tied to MAC address – attaching a specific ENI to a new instance preserves the MAC address during migration. (5) Failover: when an instance fails, detach the ENI and attach it to a replacement instance to preserve the IP address and DNS name without updating DNS records.
How do Security Groups differ from Network ACLs in practice? Intermediate
Understanding the practical differences is a common interview depth-check:
Security Groups operate at the instance/ENI level. They are stateful – when you allow inbound TCP 80 (HTTP), the outbound response traffic (TCP ephemeral ports 1024-65535) is automatically allowed without adding an outbound rule. Rules are evaluated as a group – ALL rules are checked and the most permissive match wins (no ordering). Only allow rules exist. Security group changes apply immediately to existing connections. Up to 5 security groups per ENI, up to 60 inbound and 60 outbound rules per security group by default.
Network ACLs (NACLs) operate at the subnet level, applying to all resources in the subnet. They are stateless – you must explicitly allow both inbound and outbound traffic for each flow. A rule allowing inbound TCP 80 does NOT automatically allow the outbound response – you must add an outbound rule for TCP 1024-65535 (ephemeral ports). Rules are evaluated in order (lowest rule number first); evaluation stops at the first match (rule 100 matching blocks rule 200 from evaluating). Both allow and deny rules exist. NACLs apply to traffic entering or leaving the subnet, not traffic between instances within the same subnet. Default NACL allows all; custom NACL denies all by default.
What is the Source/Destination Check on an EC2 instance? Advanced
EC2 instances have a source/destination check enabled by default. This check enforces that the instance must be the source or destination of all traffic it sends or receives. If the check is enabled and traffic arrives at an instance that is neither the source nor destination of the packet, the instance drops it.
This check must be disabled when running an EC2 instance as a network appliance that forwards traffic – specifically: NAT instances (legacy alternative to NAT Gateway), VPN concentrators, proxy servers, and software firewalls. When acting as a NAT, the instance receives traffic destined for other IPs (packets where the destination is not the NAT instance’s IP) and forwards them – which the source/destination check would block. Disable it with: aws ec2 modify-instance-attribute --instance-id i-0abc123 --no-source-dest-check. AWS-managed services like NAT Gateway and Transit Gateway handle this automatically – source/destination check disable is only needed for self-managed network appliances running on EC2.
What is an Elastic IP address and what are the costs? Beginner
An Elastic IP (EIP) is a static public IPv4 address allocated to your AWS account and associated with an EC2 instance or network interface. Unlike the dynamic public IP assigned when an instance starts (which changes on every stop/start), an Elastic IP persists and can be remapped to different instances. This makes it suitable for: pointing a DNS A record at an application server that may be replaced; hosting applications requiring a fixed IP for firewall whitelist rules at external partners; and failover architectures where you remap the EIP to a standby instance during failure.
Cost structure (updated 2024): AWS now charges $0.005/hour for ALL public IPv4 addresses attached to running instances (EIPs and standard dynamic public IPs), reflecting the growing scarcity of IPv4 addresses. EIPs not associated with a running instance cost $0.005/hour (unchanged). Best practice: use Elastic IPs only when a static public IP is genuinely required (DNS-based routing via a load balancer is usually better). Consider IPv6 as a long-term strategy to avoid IPv4 address costs. Each account has a default limit of 5 EIPs per region.
What are EC2 Placement Groups and when does each type apply? Intermediate
Placement Groups control how EC2 instances are distributed on underlying hardware, affecting latency and availability:
Cluster Placement Group: packs instances onto the same hardware rack within a single AZ. Provides the lowest possible network latency (10 Gbps enhanced networking between instances) and highest bandwidth. Best for: HPC clusters, ML training jobs where GPU-to-GPU communication is the bottleneck, big data jobs requiring intensive node-to-node data transfer (Hadoop, Spark). Risk: all instances are on the same rack – a rack power or network failure takes down all instances simultaneously. Not recommended for applications where high availability is the priority.
Spread Placement Group: places each instance on distinct hardware (separate rack with separate power and network). Maximum 7 running instances per AZ per group. Best for: small groups of critical instances that must survive individual hardware failures – primary and standby database pair, critical application nodes. The instance-per-rack limitation makes it impractical for large-scale deployments.
Partition Placement Group: divides instances into logical partitions (up to 7 per AZ), where each partition has its own set of racks with separate power and network. Instances in partition 1 never share hardware with instances in partition 2. Best for: large distributed systems (Hadoop HDFS, Apache Kafka, Apache Cassandra) with 100+ nodes that need fault domain isolation. Unlike Spread, Partition allows many instances per partition.
What is Enhanced Networking and what protocols does AWS use? Intermediate
Enhanced Networking provides higher bandwidth, higher packet-per-second (PPS) performance, and consistently lower inter-instance latency than standard virtualized networking. It uses SR-IOV (Single Root I/O Virtualization) to bypass the hypervisor’s software network stack and connect the instance directly to the physical NIC hardware.
AWS supports two Enhanced Networking implementations: ENA (Elastic Network Adapter): supports up to 100 Gbps on supported instance types (C5n, P4, M5n, etc.). The preferred and more capable implementation. Available on all current-generation instance types. Intel VF (82599 Virtual Function): older implementation, supports up to 10 Gbps. Available on some older instance types. Check if Enhanced Networking is enabled: ethtool -i eth0 – if the driver is “ena” or “ixgbevf”, Enhanced Networking is active. Enhanced Networking is enabled by default on all instances launched from current Amazon Linux AMIs on Nitro-based instance types. It requires the ENA kernel module (included in Amazon Linux 2 and later, Ubuntu 16.04+).
How does EC2 network bandwidth work? Intermediate
EC2 network bandwidth is specified per instance type (e.g., m6i.large: up to 12.5 Gbps; m6i.32xlarge: 50 Gbps; c5n.18xlarge: 100 Gbps). “Up to” bandwidth means the instance can burst to that level but is not guaranteed to sustain it continuously for all traffic. Baseline bandwidth is typically lower than the “up to” specification for smaller instance types.
Bandwidth allocation rules: traffic to/from S3 and other AWS services within the same region does not count against the EC2 network bandwidth limit (it uses a separate path). Traffic to other EC2 instances within the same region (and VPC or VPC peering) counts against the instance bandwidth. Cross-AZ traffic counts against instance bandwidth AND incurs data transfer charges. EBS throughput also uses the instance network bandwidth – a c5.xlarge with 10 Gbps network bandwidth and a gp3 volume at 1,000 MB/s (8 Gbps) leaves only 2 Gbps for regular networking. EBS-Optimized instances (all current-generation types) dedicate a separate network path to EBS I/O, preventing EBS traffic from competing with regular network traffic.
What is the difference between a public IP and an Elastic IP on EC2? Beginner
A Public IP (auto-assigned) is a dynamic address from AWS’s public IP pool. It is assigned when the instance starts in a public subnet (if the subnet’s “auto-assign public IP” setting is enabled or overridden at launch). It is released when the instance stops and a new IP is assigned when it starts again. Free of charge (though AWS now charges $0.005/hour for public IPv4 since February 2024). Cannot be moved between instances.
An Elastic IP is a persistent static public IPv4 address you allocate to your account. It stays with your account until you release it. When an instance with an EIP stops and starts, the same EIP is re-associated. Can be remapped to a different instance in the same region in seconds. Now costs $0.005/hour when associated with a running instance, same as dynamic public IPs (previously was free when associated). Use EIP when: your application needs a consistent IP that DNS or external firewalls whitelist; you need to swap IPs between instances during failover without updating DNS. Use dynamic public IP when: instances are behind a load balancer (the LB IP is what external systems see); you just need internet access for outbound traffic (can use NAT Gateway instead).
What is VPC Flow Logs and how do you analyze EC2 network traffic? Intermediate
VPC Flow Logs capture information about the IP traffic going to and from network interfaces in a VPC. Flow log records include: source IP, destination IP, source port, destination port, protocol, packet count, byte count, start/end time, action (ACCEPT or REJECT), and log status. Flow logs can be enabled at the VPC, subnet, or individual ENI level. Logs are delivered to CloudWatch Logs, S3, or Kinesis Data Firehose.
Common analysis use cases: (1) Security investigation – “What IPs was this compromised instance communicating with?” (2) Traffic pattern analysis – “Which ports are actually being used from my EC2 instances?” (3) Network troubleshooting – “Why can’t instance A reach instance B?” (REJECT records in Flow Logs identify where security groups or NACLs are blocking traffic). (4) Cost analysis – identifying unexpected cross-region or internet data transfer. Flow log analysis with Athena: create a table in the Glue Data Catalog pointing to the S3 Flow Log bucket, then query with SQL – SELECT srcaddr, dstport, COUNT(*) FROM vpc_flow_logs WHERE action='REJECT' GROUP BY 1,2 ORDER BY 3 DESC. Amazon Detective and Security Lake provide automated Flow Log analysis for security teams.
What is EC2 Serial Console access? Advanced
EC2 Serial Console provides access to the serial port of an EC2 instance, which is the lowest-level access point – equivalent to connecting a physical monitor and keyboard to a bare-metal server. Serial Console access is available even when the network is completely unavailable (misconfigured security groups, failed network interface, wrong route table) or when the OS has not fully booted (kernel panic, boot failure).
When to use Serial Console: (1) The instance is unreachable via SSH (security group misconfiguration, sshd crashed, network interface issue). (2) The instance failed to boot (corrupted /etc/fstab causing boot to hang, kernel panic). (3) Recovering access when the key pair is lost (can log in via serial console if console has password authentication enabled). Enable at the account level in EC2 console settings. Connect via the EC2 console or using the EC2-serial-console endpoint. A common recovery procedure for a “bricked” EC2 instance: use Serial Console to fix the bad fstab entry or corrupted network config that is preventing normal access. Without Serial Console, fixing boot failures requires stopping the instance, detaching the root EBS volume, attaching it to a working instance to edit the files, then reattaching and starting the original instance – a lengthy process.
AMIs, Launch Templates, and User Data – AWS EC2 Interview Questions
What are the components of an AMI? Beginner
An Amazon Machine Image (AMI) is a template used to launch EC2 instances. It consists of three components: (1) Root volume snapshot: an EBS snapshot (or S3-backed store) containing the OS, application server, applications, and configuration pre-installed. This is what becomes the root volume when you launch an instance from the AMI. (2) Launch permissions: defines which AWS accounts can use the AMI to launch instances. Options: private (only your account), public (anyone), or specific AWS account IDs. (3) Block device mapping: specifies which EBS volumes (beyond the root) to attach at launch, their sizes, types, and whether to delete them on termination.
AMI types by root storage: EBS-backed AMIs (most common): root volume is an EBS snapshot. Instance can be stopped and started, preserving data on root volume. Instance Store-backed AMIs: root volume is stored in S3 and copied to instance store at launch. Cannot be stopped (only terminated). Root data is lost on termination. Instance store-backed AMIs are legacy and rarely used today. AMI IDs are region-specific – an AMI in us-east-1 has a different ID than the same AMI in eu-west-1 even if they are the same image.
How do you create a custom AMI and what are the best practices? Intermediate
Creating a custom AMI (Golden Image): (1) Launch a base instance from an official AWS AMI (Amazon Linux 2023, Ubuntu 22.04, Windows Server 2022). (2) Install and configure everything the application needs: runtime (Java, Python, Node.js), application dependencies, monitoring agents (CloudWatch Agent, DataDog), security tools (CrowdStrike, Trend Micro), and configuration management. (3) Harden the OS: remove unnecessary packages, disable unused services, configure SSH settings, run CIS benchmark hardening scripts. (4) Create the AMI: aws ec2 create-image --instance-id i-0abc123 --name "MyApp-v2.1-$(date +%Y%m%d)" --no-reboot. The –no-reboot flag avoids rebooting the instance during image creation (images created with –no-reboot may be less consistent but allow zero downtime on the source instance).
Best practices: (1) Automate AMI creation via EC2 Image Builder or HashiCorp Packer – never manually build golden images (non-reproducible, prone to configuration drift). (2) Include the date and version in the AMI name for auditability. (3) Share AMIs with your entire AWS Organization via RAM (Resource Access Manager) rather than making them public. (4) Set up a Data Lifecycle Manager policy to deprecate old AMIs automatically. (5) Scan AMIs for vulnerabilities using Amazon Inspector before using them in production – Inspector can scan AMIs in the pipeline, catching vulnerabilities before they reach running instances.
What is EC2 Image Builder? Intermediate
EC2 Image Builder is a fully managed service for automating the creation, testing, and distribution of AMIs. Instead of manually configuring a server and creating an AMI, you define an Image Recipe (a set of components – install packages, configure settings, run scripts) and Image Builder provisions a temporary EC2 instance, runs the recipe, tests the resulting image, creates the AMI, distributes it to specified regions and accounts, and terminates the temporary instance. All automated with no manual steps.
Image Builder components are reusable YAML-based build blocks. AWS provides managed components for common tasks (installing CIS hardening, installing CloudWatch Agent, installing SSM Agent). You create custom components for application-specific installation. The pipeline can be scheduled (build a new AMI weekly with the latest OS patches applied) or triggered on demand. Integration with Inspector: add vulnerability scanning to the pipeline – if the new image has critical CVEs, the pipeline fails and does not distribute the AMI. This is the modern replacement for manually building golden images and is the recommended approach for any organization maintaining standardized AMIs.
What is the difference between a Launch Template and a Launch Configuration? Intermediate
Both define the parameters used to launch EC2 instances (AMI, instance type, security groups, user data, IAM role, etc.), but Launch Templates are the modern replacement for Launch Configurations with several advantages:
Launch Configuration (legacy): immutable – once created, it cannot be modified; create a new version to change any parameter. Does not support multiple instance types or mixed purchase options in a single Auto Scaling Group. Does not support T2/T3 Unlimited credit specification. AWS no longer plans to add new features to Launch Configurations.
Launch Template (current): supports versioning (create new versions and roll back to previous versions). Supports multiple instance types (for mixed ASG configurations). Supports Spot, On-Demand, and mixed instances in one ASG. Supports all current and future EC2 features. Allows parameter inheritance (base template + overrides). AWS recommends migrating all Launch Configurations to Launch Templates. New features like Amazon EC2 Trn1 (Trainium), latest Graviton generations, and capacity blocks are only available via Launch Templates.
What is EC2 User Data and what are its limitations? Beginner
User Data is a script passed to an EC2 instance that runs once at first boot (not on subsequent reboots by default). It bootstraps the instance by installing software, pulling configuration from S3, starting services, and running initialization logic without manual intervention. User data runs as root (on Linux) or SYSTEM (on Windows).
Limitations: (1) Size: maximum 16 KB (raw) or 64 KB (gzip-compressed). For larger initialization scripts, store the script in S3 and use a short user data script to download and execute it. (2) Runs once: by default, user data executes only on the first boot. Re-enabling it for every boot requires modifying cloud-init configuration (not recommended; use Systems Manager State Manager for idempotent configuration management). (3) No return value: user data runs asynchronously; if the script fails, the instance still reaches the Running state. Check /var/log/cloud-init-output.log for execution results. (4) Not encrypted: user data is visible in plaintext via the EC2 API and instance metadata endpoint. Never put secrets (passwords, API keys) in user data – use Secrets Manager or Parameter Store instead.
What is cloud-init and how does it process EC2 user data? Advanced
cloud-init is an open-source multi-distribution package for handling early initialization of cloud instances. It is pre-installed in Amazon Linux, Ubuntu, RHEL, and most AWS-provided AMIs. When an EC2 instance boots, cloud-init retrieves user data from the instance metadata endpoint (169.254.169.254) and processes it based on content type.
cloud-init content types: Shell script (starts with #!/bin/bash): runs the script once on first boot via the final cloud-init stage. Cloud Config YAML (starts with #cloud-config): declarative configuration for packages, files, commands, users, and more – cloud-init’s native format. MIME multipart: combines multiple parts (e.g., a cloud-config part and a shell script part) in one user data payload. cloud-init stages: detect-rootdev – find root disk; local – apply network configuration; network – run any modules needing network; config – run configuration modules (package installation, file writing); final – run user scripts. Debugging: check /var/log/cloud-init.log (detailed cloud-init processing log) and /var/log/cloud-init-output.log (stdout/stderr of user data scripts).
How do you securely pass secrets to EC2 instances at launch? Intermediate
Never embed secrets in user data (visible in plaintext via the metadata endpoint) or bake them into AMIs (anyone with AMI access sees the secrets). The secure approaches:
Method 1 – IAM Role + Secrets Manager (preferred): attach an IAM role to the EC2 instance with permission to call secretsmanager:GetSecretValue for the specific secret ARN. In the user data or application code, retrieve the secret at runtime. No secret is ever stored on the instance – it is fetched fresh and optionally cached in memory.
#!/bin/bash
# Retrieve secret at boot and write to application config
SECRET=$(aws secretsmanager get-secret-value   --secret-id prod/myapp/db   --query SecretString   --output text   --region us-east-1)
echo "DB_PASSWORD=$(echo $SECRET | jq -r .password)" >> /etc/myapp/config
Method 2 – IAM Role + SSM Parameter Store: store configuration in Parameter Store (SecureString type for sensitive values, encrypted with KMS). Retrieve in user data via aws ssm get-parameter --name /prod/myapp/db_password --with-decryption. Cheaper than Secrets Manager for high-volume reads. No automatic rotation. Method 3 – AWS Systems Manager Secrets Distribution: use SSM Distributor to push packages with embedded configs to instances without user data. Good for existing running instances.
What is the EC2 Instance Metadata Service (IMDS) and IMDSv2? Intermediate
The Instance Metadata Service provides data about the running EC2 instance accessible at the link-local address 169.254.169.254. Available metadata includes: instance ID, instance type, AMI ID, hostname, public/private IP addresses, availability zone, region, IAM role credentials (temporary credentials rotated automatically), security groups, and user data.
IMDSv1 (legacy): simple HTTP GET requests to 169.254.169.254 with no authentication – vulnerable to Server-Side Request Forgery (SSRF) attacks where a malicious application on the instance tricks it into fetching the IAM credentials from the metadata endpoint and exfiltrating them. IMDSv2 (current): session-oriented, requires a PUT request to get a session token first, then uses the token in subsequent GET requests. SSRF attacks that only allow GET requests (most SSRF vulnerabilities) cannot get a session token and cannot reach the metadata endpoint. Enforce IMDSv2: set HttpTokens=required at instance launch or via aws ec2 modify-instance-metadata-options --instance-id i-0abc --http-tokens required. AWS Config rule ec2-imdsv2-check flags non-compliant instances. As of 2023, new EC2 instances launched via console default to IMDSv2 required.
What is an EC2 instance profile? Beginner
An EC2 instance profile is the mechanism for passing an IAM role to an EC2 instance. When you attach an IAM role to an EC2 instance, AWS creates an instance profile containing the role, and assigns it to the instance. The EC2 instance (and all code running on it) can then call AWS services using the role’s permissions, with temporary credentials automatically rotated by the instance metadata service.
The instance profile and IAM role are often conflated because the console creates both simultaneously when you “attach a role to an EC2 instance”. Via CLI, they are distinct objects: first create the IAM role, then create an instance profile, add the role to the profile, and attach the profile to the instance. Only one instance profile (containing one IAM role) can be attached to an instance at a time, though the role can have multiple policies. Changing an instance profile: since 2017, you can replace the instance profile on a running instance without stopping it via ec2:AssociateIamInstanceProfile and ec2:ReplaceIamInstanceProfileAssociation APIs. Before this capability, changing the role required stopping and restarting the instance.
What is an EC2 Launch Template version and how does versioning work? Intermediate
Launch Templates support versioning – you can create multiple versions of a template and specify which version Auto Scaling Groups or manual launches use. When you modify a Launch Template, you create a new version rather than modifying in place (preserving auditability and rollback capability). Each version gets a sequential number ($Latest is always the most recent; $Default is the manually set default which does not automatically move to the latest version).
ASG version strategies: setting launch-template-version: "$Latest" means the ASG always uses the newest version (good for dev/test, risky for production). Setting a specific version number (e.g., version 5) pins the ASG to a tested, approved version (recommended for production). When you update the AMI (e.g., new patched AMI), create a new Launch Template version pointing to the new AMI and update the ASG to use it – trigger an instance refresh to gradually replace running instances with the new AMI without downtime: aws autoscaling start-instance-refresh --auto-scaling-group-name my-asg --preferences '{"MinHealthyPercentage":90}'.
Auto Scaling and Load Balancing – AWS EC2 Interview Questions
What is EC2 Auto Scaling and what problem does it solve? Beginner
EC2 Auto Scaling automatically adjusts the number of EC2 instances in response to demand, ensuring you have the right number of instances at all times. Without Auto Scaling, you face two bad outcomes: over-provisioning (paying for idle capacity at 3 AM) or under-provisioning (slow, degraded performance during traffic spikes). Auto Scaling solves both by scaling out (adding instances) when load increases and scaling in (removing instances) when load drops.
Components: An Auto Scaling Group (ASG) is the logical group of EC2 instances. It has three capacity settings: minimum (never go below this count), maximum (never exceed this count), and desired (the current target count). The ASG uses a Launch Template (or Launch Configuration) to know what type of instance to launch. Scaling policies define the rules for when to change desired capacity. Health checks determine when to replace unhealthy instances. The ASG integrates with Elastic Load Balancers to automatically register and deregister instances as they launch and terminate.
What are the types of Auto Scaling policies? Intermediate
AWS provides four scaling policy types, each suited for different scenarios:
Target Tracking Scaling: the simplest and most recommended policy. You specify a metric and a target value; Auto Scaling creates the required CloudWatch alarms and adjusts capacity to keep the metric at the target. Example: keep average CPU utilization at 60%. If CPU goes above 60%, scale out; below 60%, scale in. Works best for most web application workloads.
Step Scaling: defines different scaling actions based on the magnitude of the metric breach. Example: if CPU is 60-80%, add 1 instance; if 80-100%, add 3 instances. More granular than target tracking. Scale-in must be configured separately. Good for workloads where the response should be proportional to the severity of the load spike.
Simple Scaling: the legacy policy type. Add or remove a specific number of instances when a CloudWatch alarm triggers. Waits for the cooldown period to complete before evaluating another alarm. Rarely used today – Step Scaling replaced it with better granularity.
Scheduled Scaling: scale to a specific capacity at a specific time. Example: every Friday at 4 PM, increase desired capacity from 4 to 8 to prepare for end-of-week traffic spike; every Sunday at midnight, scale back to 4. Used when traffic patterns are predictable. Scheduled actions do not use CloudWatch alarms – they fire at the scheduled time regardless of current metrics.
Predictive Scaling: uses machine learning to analyze historical CloudWatch metrics and forecast future demand. Auto Scaling scales in advance out before anticipated load spikes, rather than reacting after the spike starts. Requires at least 24 hours of metric history. Best for cyclical traffic patterns (daily, weekly) with consistent peaks.
What is the Auto Scaling cooldown period and warm-up time? Intermediate
The cooldown period (default: 300 seconds) is a pause after a scaling activity completes, during which Auto Scaling does not execute another scaling action. This gives newly launched instances time to start handling traffic before the ASG evaluates whether additional scaling is needed. Without a cooldown, an ASG could launch 10 instances in rapid succession when 2 would have sufficed, because the metric has not yet had time to drop after the first launch.
Cooldown applies to Simple Scaling policies. Target Tracking and Step Scaling use instance warm-up time instead – the time (in seconds) after a new instance launches before its metrics contribute to the ASG’s aggregate CloudWatch metrics. During warm-up, the new instance’s CPU (for example) does not count in the average used for scaling decisions. This prevents the ASG from seeing a temporary high-CPU signal from the new instance bootstrapping and triggering another scale-out. Set warm-up time to the actual time it takes for your instance to become fully operational (boot + application startup + cache priming). If your application takes 90 seconds to become ready, set warm-up to 90 seconds.
What are Auto Scaling lifecycle hooks? Advanced
Lifecycle hooks pause the instance at a specific transition in the Auto Scaling lifecycle, allowing custom actions to be performed before the instance enters service or terminates. Without lifecycle hooks, instances transition immediately: launched instances go directly to InService, and terminating instances shut down immediately.
Two hook types: Launch (autoscaling:EC2_INSTANCE_LAUNCHING): instance pauses in Pending:Wait state after launch but before entering InService. Use to: install software not included in the AMI, pull configuration from S3, register with a configuration management system, wait for application-level health checks. Termination (autoscaling:EC2_INSTANCE_TERMINATING): instance pauses in Terminating:Wait state before shutdown. Use to: drain in-flight requests, upload logs to S3, deregister from service discovery, send a final metrics flush. During the wait, you complete the hook via aws autoscaling complete-lifecycle-action --lifecycle-action-result CONTINUE (to proceed) or ABANDON (to abort scaling for this instance). If the hook times out (default: 3600 seconds, max: 7200), Auto Scaling acts based on DefaultResult (CONTINUE or ABANDON). Hook notifications delivered to SNS or SQS; processing typically done via Lambda triggered from SQS.
What is EC2 Auto Scaling instance refresh? Intermediate
Instance refresh is the mechanism for updating all instances in an ASG to a new Launch Template version without manually terminating instances. When you create a new AMI (with OS patches, for example) and update the Launch Template to point to the new AMI, the running instances still use the old AMI. Instance refresh gradually replaces them.
How it works: Auto Scaling terminates a batch of instances and waits for replacements (using the new Launch Template) to pass health checks before proceeding to the next batch. The minimum healthy percentage setting controls how many instances remain in service during the refresh. Example: a 10-instance ASG with MinHealthyPercentage=80 will have at most 2 instances in replacement at once. Configure: aws autoscaling start-instance-refresh --auto-scaling-group-name my-asg --preferences '{"MinHealthyPercentage":90,"InstanceWarmup":60}'. Checkpoint feature: pause the refresh after replacing N% of instances, allowing manual validation before proceeding. Cancel instance refresh: returns remaining old instances to service without replacing them. Compare to Deployment Strategies: Instance Refresh is comparable to a rolling update, not a blue/green deployment. For blue/green, use separate ASGs with traffic shifting via load balancer target group weights.
How does Auto Scaling handle unhealthy instances? Intermediate
Auto Scaling monitors instance health using two mechanisms: EC2 status checks (default) and Elastic Load Balancer health checks (optional, but strongly recommended for web workloads). EC2 status checks detect hardware and OS failures – if the underlying host fails or the OS is unresponsive. ELB health checks detect application-level failures – if your application is running but returning HTTP 500 errors or failing custom health check paths.
When an instance is marked unhealthy: Auto Scaling terminates it and launches a replacement in the same AZ. The replacement uses the current Launch Template version. If the instance was registered with an ELB, it is first deregistered (connection draining completes pending connections). The health check grace period (default: 300 seconds) prevents Auto Scaling from marking a newly launched instance as unhealthy while it is still initializing. Without a grace period, if your application takes 120 seconds to start, the ASG would see the ELB health check failing and terminate the instance before it finishes booting. Set the grace period to slightly longer than your worst-case startup time.
What is a mixed instance type ASG and when do you use it? Advanced
A mixed instance type ASG (configured via Launch Template overrides) launches instances from multiple instance types and purchase options (On-Demand + Spot) in a single ASG. This is the recommended architecture for production workloads requiring cost optimization without sacrificing availability.
Configuration example: base capacity of 2 On-Demand instances (guaranteed availability for minimum capacity) plus 8 Spot instances from a pool of m5.xlarge, m5a.xlarge, m4.xlarge, and m5.2xlarge (4 types × 3 AZs = 12 capacity pools to draw from). Spot allocation strategy: capacityOptimized (pick the pool with most available capacity) or price-capacity-optimized. If Spot is interrupted in one pool, the ASG replaces from another pool. The On-Demand base ensures the application continues even if all Spot capacity is reclaimed. Cost: the 8 Spot instances typically cost 70-80% less than On-Demand, saving ~60% overall while maintaining availability. Define instance weights: if your application needs 4 units of capacity and an m5.xlarge provides 1 unit while an m5.4xlarge provides 4 units, weight them accordingly so the ASG meets capacity in units rather than instance count.
What is Elastic Load Balancing and what are the load balancer types? Beginner
Elastic Load Balancing (ELB) distributes incoming traffic across multiple EC2 instances, containers, or IP addresses. ELB performs health checks and routes traffic only to healthy targets, automatically removing unhealthy targets and restoring them when they recover. AWS offers four load balancer types:
| Type | Layer | Protocols | Key Feature | Use Case |
|---|---|---|---|---|
| Application LB (ALB) | Layer 7 | HTTP, HTTPS, WebSocket | Content-based routing (path, host, header, query string) | Web apps, microservices, containers |
| Network LB (NLB) | Layer 4 | TCP, UDP, TLS | Ultra-low latency, static IP, millions of req/sec | TCP/UDP apps, financial systems, gaming |
| Gateway LB (GWLB) | Layer 3 | IP packets (GENEVE) | Transparent bump-in-the-wire for security appliances | Firewalls, IDS/IPS, deep packet inspection |
| Classic LB (CLB) | L4/L7 | HTTP, HTTPS, TCP, SSL | Legacy – no longer recommended | Legacy EC2-Classic workloads only |
ALB vs NLB selection: use ALB when you need HTTP routing (path-based, host-based), WebSocket support, or integration with AWS WAF for web application firewall. Use NLB when you need a static IP (NLB provides one per AZ, usable for whitelist-based access), TCP/UDP protocols, extremely low latency (NLB adds microseconds vs ALB adding milliseconds), or need to preserve the client’s source IP address (NLB passes the source IP through; ALB replaces it with its own IP unless you read the X-Forwarded-For header).
How does ALB path-based and host-based routing work? Intermediate
ALB listener rules define how incoming requests are routed to target groups. Each rule has conditions and an action. Conditions can match on: path pattern (/api/* routes to the API target group; /static/* routes to a CDN or static file server), host header (api.example.com routes to API servers; app.example.com routes to web servers), HTTP headers, HTTP methods, query strings, and source IP. Rules are evaluated in priority order (lowest number = highest priority); the default rule (always at the bottom) handles traffic that matches no other rule.
Target groups are the actual compute destinations. An ALB can route to multiple target groups simultaneously based on rules. Target types: EC2 instances (by instance ID), IP addresses (for containers, on-premises servers, or Lambda), or Lambda functions. Each target group has its own health check configuration. Weighted target groups: you can split traffic between two target groups by percentage – useful for A/B testing or blue/green deployments. Example: gradually shift traffic from the old version (target group 1) to the new version (target group 2) by changing weights from 90/10 to 50/50 to 0/100. ALB supports sticky sessions (session affinity) using load balancer-generated or application-generated cookies – requests from the same client are sent to the same target for the duration of the sticky session.
What is connection draining and deregistration delay? Intermediate
When an EC2 instance is deregistered from a load balancer target group (either because it was marked unhealthy, or because Auto Scaling is terminating it, or because you manually removed it), there may be in-flight requests that have already been routed to the instance. Without connection draining, those requests would fail immediately as the LB stops sending traffic to the instance.
Deregistration delay (formerly called connection draining for CLB) is the time the load balancer waits after deregistering an instance before completing the deregistration. During this period: the LB stops sending NEW requests to the deregistered instance, but allows existing in-flight requests to complete. Default: 300 seconds. Range: 0 to 3600 seconds. Set it to slightly longer than your longest request timeout. For API servers where requests complete in under 5 seconds, 30 seconds is more than sufficient – no need to wait 5 minutes. For batch processing endpoints that run long requests, increase accordingly. Setting deregistration delay to 0 completes immediately with no draining (appropriate for stateless services where you can immediately retry on another instance). During an Auto Scaling scale-in, the ASG waits for the deregistration delay to complete before terminating the instance.
Advanced Topics and Troubleshooting – AWS EC2 Interview Questions
How do you troubleshoot an EC2 instance that is not responding to SSH? Intermediate
A systematic troubleshooting approach, from most to least likely cause:
Step 1 – Check EC2 status checks: in the console or via aws ec2 describe-instance-status. System status check failure = AWS infrastructure problem (host hardware failure) – stop and start the instance (it moves to new hardware). Instance status check failure = OS problem (kernel panic, disk full, corrupted file system). Step 2 – Security group rules: verify the security group on the instance allows inbound TCP 22 from your current IP. A common cause is that your IP changed and the security group still has the old IP. Step 3 – Network ACL: if the security group looks correct, check the subnet’s NACL for both inbound TCP 22 AND outbound TCP 1024-65535 (ephemeral ports for the response). NACLs are stateless – missing the outbound ephemeral port rule is a frequent issue. Step 4 – Route table: verify the subnet has a route to an Internet Gateway (for public subnets) or that the instance has a public IP / Elastic IP. Step 5 – SSH service and key pair: if network is fine, the issue may be sshd crashing or wrong key pair. Use EC2 Serial Console (if enabled) to check sshd status. Step 6 – Instance store or EBS full: df -h via Serial Console – a full disk prevents login. Step 7 – AWS Systems Manager Session Manager: if SSM Agent is installed and running, you can connect without SSH at all – use this as the fallback and to fix the underlying SSH issue.
What is AWS Systems Manager Session Manager and how does it replace SSH? Intermediate
AWS Systems Manager Session Manager provides interactive browser-based shell access to EC2 instances without opening any inbound ports, without managing SSH keys, and without a bastion host. Sessions use an encrypted WebSocket connection from the SSM Agent on the instance to the SSM endpoint (over outbound HTTPS port 443), which is then forwarded to your browser or CLI session.
Advantages over SSH: no security group inbound rules required (attack surface eliminated); no key pair management; access controlled by IAM policies (no separate user accounts); full session logging to S3 or CloudWatch Logs for compliance; works in private subnets with no internet access (via VPC endpoints). Requirements: SSM Agent must be installed and running (pre-installed on Amazon Linux 2+, Ubuntu 20.04+, Windows Server 2016+); the instance must have an IAM role with the AmazonSSMManagedInstanceCore policy. Connect: aws ssm start-session --target i-0abc123 or via the EC2 console → Connect → Session Manager. Port forwarding via SSM: aws ssm start-session --target i-0abc123 --document-name AWS-StartPortForwardingSession --parameters '{"portNumber":["5432"],"localPortNumber":["5432"]}' – tunnels database traffic through SSM without VPN.
How do you debug a failing EC2 user data script? Intermediate
User data failures are silent – the instance reaches Running state even if the user data script fails. Debugging steps:
Check cloud-init output log: cat /var/log/cloud-init-output.log – this captures stdout and stderr of the user data script. This is the first place to look. Check cloud-init processing log: cat /var/log/cloud-init.log – shows cloud-init’s own processing, including which stage failed. View user data on the instance: curl http://169.254.169.254/latest/user-data – confirms the script the instance actually received (useful if user data was base64-encoded or truncated). Re-run user data manually: copy the script from cloud-init-output.log and run it manually via Session Manager or SSH to see interactive output. Common failures: (1) Missing dependencies – the script tries to use a tool not yet installed. Fix: install dependencies first or use package manager. (2) Wrong shell – user data starting with #!/usr/bin/python3 but Python is not installed. (3) Network not ready – script tries to reach S3 or an API but the network is not fully up. Fix: add retries with exponential backoff. (4) Permissions – script runs as root but tries to write to a user-owned directory. (5) AWS CLI not available or not yet configured. (6) User data over 16 KB – truncated silently; store large scripts in S3 and download them. Add explicit error handling to scripts: set -e at the top to exit on first error and write logs to /var/log/init-custom.log for easier debugging.
How do you recover an EC2 instance with a corrupted file system or bad fstab? Advanced
A bad /etc/fstab entry (invalid device, wrong UUID) causes the instance to hang at boot, waiting indefinitely for the missing mount. The instance never reaches the Running state’s SSH-accessible point. Two recovery approaches:
Method 1 – EC2 Serial Console (fastest if enabled at account level): connect to the serial console in the EC2 console, wait for the boot prompt that asks whether to wait for the failed mount or skip it, press S to skip, then fix /etc/fstab once you have shell access. Method 2 – EBS volume detach and reattach: (1) Stop the problematic instance. (2) Detach the root EBS volume (note the device name, typically /dev/xvda or /dev/sda1). (3) Attach the volume to a working “rescue” instance as a secondary volume (e.g., /dev/xvdf). (4) Mount the volume on the rescue instance: sudo mount /dev/xvdf1 /mnt/recovery. (5) Edit /mnt/recovery/etc/fstab to fix the error. (6) Unmount and detach from the rescue instance. (7) Reattach to the original instance as /dev/xvda. (8) Start the original instance. Method 2 works for any file system corruption, not just fstab. For Windows: similar process using a rescue EC2 instance, attaching the disk, running chkdsk or regedit to fix registry issues, then reattaching.
What causes T-series instance CPU credit exhaustion and how do you prevent it? Intermediate
T-series instances (T2, T3, T4g) earn CPU credits continuously at the baseline rate (e.g., t3.micro earns 6 CPU credits/hour = 10% of one vCPU). Credits accumulate up to a maximum balance (t3.micro: 144 credits = 24 hours at baseline). When CPU usage exceeds the baseline, credits are consumed. When the balance reaches zero, CPU is throttled to the baseline percentage.
Common causes of exhaustion: (1) CI/CD workloads that run compilation, test suites, or Docker builds on T-series instances – these burst heavily during builds but a t3.small may not accumulate enough credits between builds. (2) Web servers handling sustained above-baseline traffic after a launch or viral event. (3) Database instances running on T-series that experience sustained query load. (4) Cron jobs or batch processes scheduled at the same time every day, depleting the overnight-accumulated credit bank. Prevention strategies: (1) Enable T3/T4 Unlimited mode – allows the instance to burst past the credit balance at a per-CPU-credit charge ($0.05/vCPU-hour above baseline for t3). Monitor CPUSurplusCreditsCharged to track the cost. (2) Monitor CPUCreditBalance – alert at 20 credits remaining so you can act before exhaustion. (3) Right-size to a fixed-performance instance (m5, c6i) if your workload genuinely needs consistent CPU – T-series is not appropriate for sustained load. (4) Schedule intensive workloads during periods when the credit balance has fully replenished.
How do you migrate an EC2 instance from one region to another? Intermediate
There is no direct “move” operation for EC2 instances across regions. The process uses AMI copying:
# Step 1: Create an AMI from the source instance
aws ec2 create-image   --instance-id i-0abc123   --name "migration-$(date +%Y%m%d)"   --no-reboot   --region us-east-1

# Step 2: Copy the AMI to the destination region
aws ec2 copy-image   --source-image-id ami-0abc123   --source-region us-east-1   --destination-region eu-west-1   --name "migration-eu"

# Step 3: Launch a new instance from the copied AMI in destination region
aws ec2 run-instances   --image-id ami-0xyz789   --instance-type m5.large   --subnet-id subnet-destination   --region eu-west-1
Important considerations: (1) Security groups are not copied by copy-image – recreate them in the destination region or use AWS CloudFormation/CDK to manage security groups as code. (2) EBS snapshots used by the AMI are copied with the image copy operation. (3) Elastic IPs are region-specific – allocate a new EIP in the destination region. (4) IAM roles are global and do not need to be recreated. (5) Data transfer costs: copying an AMI across regions incurs outbound data transfer charges from the source region (~$0.02/GB for us-east-1 to eu-west-1). (6) For large-scale migrations (dozens of instances, complex network configurations), use AWS Application Migration Service (MGN), which replicates data continuously and performs a final cutover with minimal downtime.
What is AWS Systems Manager Patch Manager and how does it work with EC2? Intermediate
Patch Manager is an SSM capability that automates the patching of EC2 instances at scale. It replaces manual patching (SSH to each instance, run apt/yum update) with a managed, auditable process that can patch thousands of instances on a schedule.
Key concepts: Patch baseline: defines which patches are approved. AWS provides default baselines per OS (AmazonLinux2023DefaultPatchBaseline, etc.) that auto-approve patches after a 7-day delay. You can create custom baselines that approve only specific severities (Critical, Important) or specific CVEs. Patch group: a tag-based grouping of instances. Tag instances with Patch Group: Production and associate that tag with a specific baseline. Maintenance window: a scheduled time window during which Patch Manager runs. Define it to run during off-peak hours (Sunday 2-4 AM). Patch compliance: Patch Manager reports on which instances are compliant and which have missing patches. View via Systems Manager console or query via SSM API. Process: SSM Agent on each instance receives the patch task during the maintenance window, downloads and installs approved patches, and reports results back to SSM. Instances can be configured to reboot automatically after patching or to defer reboots for operator review. Integration with Change Manager: require approval before the patching maintenance window runs, creating an auditable change management trail.
What are EC2 service quotas and how do you manage them? Intermediate
EC2 service quotas limit the amount of resources you can provision per account per region. Default limits exist to prevent runaway costs and infrastructure abuse. Key quotas: vCPUs per region per instance family (Running On-Demand Standard (A, C, D, H, I, M, R, T, Z) instances: 32 vCPUs by default); Running On-Demand F instances: 176 vCPUs; Spot Instance requests: 640 vCPUs per region; Elastic IP addresses: 5 per region; AMIs: 10,000 per region.
How quotas work: EC2 enforces vCPU quotas, not instance count quotas. Launching 4 m5.2xlarge instances uses 32 vCPUs against your On-Demand Standard limit. Requesting quota increases: go to Service Quotas console → AWS Services → Amazon EC2 → select the quota → Request Quota Increase. Provide a business justification. Increases for vCPUs are typically approved within 24 hours for reasonable requests. For large increases (requesting 10,000 vCPUs), expect review and potential follow-up questions. Monitor quota usage: CloudWatch quotas metric, or use AWS Service Quotas API to check current utilization. Set CloudWatch alarms at 80% of quota to request in advance increases before hitting limits. Quotas are per region per account – a limit in us-east-1 does not affect eu-west-1.
What is AWS Fault Injection Simulator (FIS) and how do you use it with EC2? Advanced
AWS Fault Injection Simulator (FIS) is a managed chaos engineering service that lets you run controlled fault injection experiments on your AWS resources to test resilience. For EC2, FIS can: terminate instances, stop instances, send high CPU stress (using SSM Run Command to run stress-ng), inject network latency and packet loss, trigger EC2 Spot interruptions (simulating the 2-minute warning before Spot capacity is reclaimed), and pause Auto Scaling scaling activities.
How to run a Spot interruption test: create an FIS experiment template with the aws:ec2:send-spot-instance-interruptions action targeting instances by tag (e.g., Purpose=chaos-test). Set stop conditions (if the experiment causes more than X CloudWatch alarm breaches, halt automatically to prevent production impact). Run the experiment – FIS sends mock Spot interruption signals to the targeted instances, and your application’s interruption handler runs. Verify: check if the workload gracefully checkpointed, if the ASG launched replacement instances, and if the load balancer successfully drained connections. FIS is the recommended tool for validating: Spot interruption handling, Auto Scaling behavior under failure, the effectiveness of lifecycle hooks, and multi-AZ failover. Chaos engineering practice: run experiments in production during business hours (not at 3 AM) with real traffic to get meaningful signal about actual system behavior.
How do you investigate and resolve high I/O wait on an EC2 instance? Advanced
I/O wait (shown as %iowait in top or iostat) indicates the CPU is idle while waiting for disk I/O operations to complete. On an EC2 instance, this points to EBS volume I/O being the bottleneck rather than CPU compute. Diagnosis steps:
Step 1 – Identify the bottleneck resource: run iostat -x 1 10 to see per-device I/O statistics. Look for: %util (percentage of time the device is busy – values near 100% indicate saturation), await (average time in milliseconds for I/O requests to complete – normal EBS gp3 should be under 2-4ms for sequential, up to 10ms for mixed workloads), r/s and w/s (reads and writes per second). Step 2 – Check CloudWatch EBS metrics: VolumeQueueLength > 1 indicates I/O requests queuing (volume cannot keep up with demand), VolumeThroughputPercentage and VolumeConsumedReadWriteOps show whether you are hitting volume limits. Step 3 – Identify which processes are causing I/O: iotop -oPa shows I/O per process. Resolution options: (1) Upgrade volume type: migrate gp2 to gp3, or gp3 to io2 for higher IOPS. (2) Increase provisioned IOPS/throughput on the volume (for gp3 and io2). (3) Switch to a larger instance type with higher EBS bandwidth allocation. (4) Add EBS volumes and stripe them (RAID 0) to multiply I/O capacity. (5) Move I/O-intensive data to an Instance Store volume (dramatically higher IOPS, data non-persistent). (6) Optimize application queries – a poorly indexed database query generating random I/O may be the root cause rather than insufficient EBS capacity.
What is EC2 Instance Connect and how does it work? Intermediate
EC2 Instance Connect is a way to connect to EC2 instances via SSH directly from the AWS console or CLI without distributing SSH private keys. Instead of pre-placing a public key in ~/.ssh/authorized_keys and distributing the corresponding private key to every operator who needs access, EC2 Instance Connect pushes a temporary one-time-use SSH public key to the instance just before you connect.
Process: when you click “Connect” in the EC2 console (using Instance Connect), or run aws ec2-instance-connect send-ssh-public-key, AWS pushes your temporary public key to the instance’s metadata. The instance’s AuthorizedKeysCommand in sshd_config (configured by the ec2-instance-connect package) reads this key. The key expires after 60 seconds, which is enough time to initiate the SSH session. After that, normal SSH key negotiation keeps the session alive. Access control: who can use Instance Connect is controlled by IAM – attach a policy allowing ec2-instance-connect:SendSSHPublicKey for specific instance IDs or tags. Revoking SSH access is simply revoking the IAM permission – no need to distribute key revocations across hundreds of instances. Requirements: the ec2-instance-connect package must be installed (pre-installed on Amazon Linux 2/2023, Ubuntu 20.04+). The instance must be reachable (security group must allow TCP 22 from your IP or the Instance Connect endpoint IP range). EC2 Instance Connect Endpoint (2023): allows connecting to instances in private subnets without a public IP or bastion host, using a VPC endpoint.
What is AWS Compute Optimizer and how does it help right-size EC2? Intermediate
AWS Compute Optimizer analyzes CloudWatch utilization metrics for your EC2 instances and generates right-sizing recommendations. It uses machine learning to model workload patterns and identify instances that are over-provisioned (wasting money) or under-provisioned (degrading performance).
What it analyzes: CPU utilization (average and peak), memory utilization (requires CloudWatch Agent with memory metrics), network I/O, and disk I/O over a 14-day lookback period (extendable to 93 days with enhanced recommendations). Recommendation types: Optimized (current instance type is appropriate), Over-provisioned (downsize to save cost), Under-provisioned (upsize for better performance), and Not enough data (insufficient metrics). Each recommendation shows the projected performance change and estimated monthly cost savings. Example output: “Your m5.4xlarge is over-provisioned. Downsize to m5.xlarge to save $180/month. Projected CPU p99 increases from 42% to 71% – within acceptable range.” Enable enhanced recommendations: install CloudWatch Agent on instances to send memory metrics (Compute Optimizer cannot see memory without agent instrumentation). Savings Estimator integration: Compute Optimizer shows savings for both right-sizing AND applying Reserved Instances or Savings Plans to the recommended instance type. Supports EC2 instances, Auto Scaling groups, EBS volumes, Lambda functions, ECS tasks on Fargate, and RDS – a single-pane-of-glass for compute optimization across the account.
How does EC2 work with Route 53 for high availability? Intermediate
Route 53 provides DNS-based traffic management that enables high availability across EC2 instances and regions. Key routing policies:
Failover routing: configure a primary record pointing to your active EC2 instance or load balancer, and a secondary record pointing to a standby. Route 53 performs health checks (TCP, HTTP, HTTPS) against the primary endpoint. If the health check fails, Route 53 automatically routes traffic to the secondary record within 30-60 seconds (typical time for DNS propagation with TTL of 60 seconds). Use for active-passive failover architectures. Latency-based routing: Route 53 routes users to the AWS region with the lowest network latency for their location. Enables a multi-region EC2 deployment where US users go to us-east-1 and European users go to eu-west-1. Weighted routing: split traffic between multiple records by percentage. Useful for canary deployments (5% to new EC2 instances, 95% to existing) before committing to a full cutover. Geolocation routing: route traffic based on the user’s country or continent. EU users go to EU instances (for GDPR compliance), North American users go to US instances. Health checks with EC2: Route 53 can directly check EC2 instance endpoints (if they have public IPs). For EC2 behind ELB, check the ELB DNS name instead. CloudWatch alarm-based health checks: create a CloudWatch alarm on any EC2 metric, then use the alarm state as the Route 53 health check – if the alarm fires, Route 53 considers the endpoint unhealthy and fails over.
What is AWS Global Accelerator and how is it different from CloudFront? Advanced
AWS Global Accelerator routes user traffic through AWS’s global backbone network to EC2 instances or load balancers, reducing the number of internet hops and improving latency and packet loss. It provides two static anycast IP addresses that advertise from all AWS edge locations globally – users always connect to the nearest edge location, which then forwards traffic via the AWS backbone to your EC2 instances.
Global Accelerator vs CloudFront: CloudFront is a content delivery network that caches HTTP responses at edge locations. Ideal for static content (images, videos, JavaScript files) and HTTP/HTTPS API responses that can be cached. Content is served from cache without reaching the origin EC2 instance. Global Accelerator does not cache – it proxies all traffic through the AWS backbone network. Ideal for: dynamic content that cannot be cached, non-HTTP protocols (TCP, UDP), applications requiring consistent low latency (gaming, financial trading), and applications that need static IPs for whitelisting. EC2 use case: a real-time trading application running on EC2 in us-east-1 needs to serve global users with the lowest possible latency. Global Accelerator sends all users’ traffic through the AWS backbone from their nearest edge location, reducing latency by 10-40% compared to traversing the public internet all the way to us-east-1. Failover: Global Accelerator monitors endpoint health (health checks on EC2 instances or ALBs) and redirects traffic to healthy endpoints in under 30 seconds if a regional failure occurs.
How do you implement auto-recovery for EC2 instances? Intermediate
EC2 auto-recovery automatically recovers an instance if it experiences an unexpected issue. Two mechanisms exist:
CloudWatch alarm-based recovery: create a CloudWatch alarm that monitors StatusCheckFailed_System (the AWS system-level status check). Set the alarm action to recover the instance: aws cloudwatch put-metric-alarm --alarm-name "auto-recover-i-0abc123" --metric-name StatusCheckFailed_System --namespace AWS/EC2 --dimensions Name=InstanceId,Value=i-0abc123 --evaluation-periods 2 --period 60 --statistic Maximum --threshold 0 --comparison-operator GreaterThanThreshold --alarm-actions arn:aws:automate:us-east-1:ec2:recover. When the alarm fires, AWS migrates the instance to new underlying hardware while preserving its instance ID, private IP, Elastic IP, and EBS volumes. This is different from stopping/starting (which also moves hardware but goes through the stopped state). Recovery works for EBS-backed instances only and is available on most current instance types. Health check + Auto Scaling: for instances in an ASG, the ASG health check mechanism terminates and replaces unhealthy instances automatically (already discussed in Q56). For standalone instances (not in an ASG), the CloudWatch alarm recovery is the appropriate mechanism. Both approaches require EBS-backed instances – Instance Store-backed instances cannot be recovered (data would be lost).
What is EC2 Image Builder pipeline and how do you set up automated AMI patching? Advanced
Maintaining patched AMIs is critical for security – launching instances from a 6-month-old AMI means those instances immediately need 6 months of OS patches applied, delaying production readiness and increasing the vulnerability window. EC2 Image Builder automates building new AMIs on a schedule with the latest patches applied.
Pipeline setup: (1) Source image: start from the latest Amazon Linux 2023 AMI (use a dynamic reference arn:aws:imagebuilder:us-east-1:aws:image/amazon-linux-2023-x86/x.x.x to always pick the latest). (2) Components: add the AWS-managed update-linux component (runs yum/dnf update to apply all available patches), then add custom components for your application’s requirements (install Java 21, install CloudWatch Agent, configure SSM Agent, apply CIS Level 1 hardening). (3) Tests: add the simple-boot-test-linux component to verify the instance boots successfully and the SSM Agent is responsive. Add custom tests for application-specific checks. (4) Distribution: configure the AMI to be copied to all regions where you operate and shared with all accounts in your AWS Organization via RAM. (5) Schedule: trigger the pipeline weekly (Sundays at midnight) to ensure AMIs are never more than 7 days old. Inspector integration: add Amazon Inspector scanning to the pipeline. If critical CVEs are found in the new AMI, the pipeline fails and does not distribute it – preventing a vulnerable AMI from reaching production. After each successful build, trigger an Auto Scaling instance refresh to gradually replace running instances with the new patched AMI.
What is the EC2 metadata endpoint and what are the security implications? Intermediate
The EC2 metadata service is accessible at the link-local address 169.254.169.254 from within any EC2 instance. The most security-sensitive data it provides is temporary IAM role credentials: the access key, secret key, and session token for the instance’s attached IAM role, rotated automatically every few hours. Any code running on the instance (applications, shell scripts, containers) can retrieve these credentials without any authentication – just an HTTP request.
Security risk: if a web application running on EC2 has a Server-Side Request Forgery (SSRF) vulnerability, an attacker can trick it into making an HTTP request to 169.254.169.254/latest/meta-data/iam/security-credentials/my-role and exfiltrate the IAM credentials. This has been exploited in several high-profile cloud security incidents. The Capital One breach (2019) used SSRF against an EC2 instance’s metadata endpoint to steal credentials and access S3 data. IMDSv2 mitigation: IMDSv2 requires a PUT request with a TTL header to obtain a session token before GET requests work. SSRF vulnerabilities typically only allow GET requests, so they cannot obtain the token. Enforce IMDSv2: aws ec2 modify-instance-metadata-options --instance-id i-0abc --http-tokens required --http-put-response-hop-limit 1. Set hop-limit to 1: prevents containerized workloads from accessing the metadata service (the container’s network hop from the container network namespace to the EC2 instance counts as one hop). If containers need metadata access, set hop-limit to 2, but be aware of the increased exposure surface. AWS Config rule ec2-imdsv2-check: flags all instances with IMDSv2 not enforced.
How do you implement EC2 tagging strategy and why is it important? Intermediate
EC2 tags (key-value pairs attached to instances) are essential for cost allocation, access control, automation, and operations. Poor tagging strategy leads to untracked spend, inability to identify resource owners, and failed automation.
Recommended required tags for every EC2 instance: Environment (prod/staging/dev/sandbox), Application (the service or application name), Owner (team or individual email responsible for the resource), CostCenter (for finance allocation), Managed-By (terraform/cloudformation/manual – how was this instance provisioned). Use cases: (1) Cost allocation: activate tags as cost allocation tags in the billing console – Cost Explorer then breaks down EC2 costs by application, environment, and team. (2) IAM access control: StringEquals aws:ResourceTag/Environment: prod condition in IAM policies restricts who can stop or terminate production instances. (3) Automation: Patch Manager, Backup, and Config Rules all use tags to target resources. (4) Finding resources: tag-based filtering in the console and CLI. Enforcement: AWS Config rule required-tags flags instances missing required tags. Tag policies via AWS Organizations: define allowed tag keys and values at the organization level and enforce them across all accounts. Avoid: tags are not encrypted (do not put secrets in tag values); tag key and value are limited to 128 and 256 characters; EC2 instances have a limit of 50 tags per resource.
What is AWS Backup for EC2 and how does it differ from EBS snapshots? Intermediate
AWS Backup is a centralized backup service that manages backups for EC2 instances (and other AWS services: RDS, DynamoDB, EFS, FSx, Aurora) from a single console with a unified backup policy, lifecycle management, and compliance reporting. An EC2 backup via AWS Backup creates an AMI (capturing all attached EBS volumes) with associated EBS snapshots.
Differences from manual EBS snapshots: EBS snapshots capture a single volume; AWS Backup for EC2 creates an AMI capturing ALL attached volumes simultaneously (multi-volume crash-consistent backup). AWS Backup applies centralized backup plans with schedules, retention periods, and lifecycle transitions (move to Backup Archive tier after 30 days to reduce cost). AWS Backup maintains an inventory of all backed-up resources and enforces retention policies automatically. Compliance: AWS Backup provides a compliance dashboard and can generate reports for auditors showing that every EC2 instance is backed up according to policy. Cross-region/cross-account backup: replicate backups to another region or account for disaster recovery. AWS Backup Vault Lock: a WORM (Write Once Read Many) policy for vaults – once a backup is in a locked vault, it cannot be deleted by anyone (including the root user) until the retention period expires. This satisfies ransomware protection and compliance requirements that mandate immutable backups. Recovery: restore an EC2 instance from an AWS Backup by launching a new instance from the stored AMI – identical to launching from a manually created AMI.
How do EC2 Reserved Instance Marketplace and RI exchanges work? Advanced
The Reserved Instance Marketplace allows selling unused Standard RIs to other AWS customers, providing an exit if workloads change before the RI term ends. If you purchased a 3-year m5.2xlarge RI in us-east-1 but migrated to m6i instances after 18 months, you can list the remaining 18 months of the RI for sale. The marketplace shows a real-time listing of available RIs; buyers purchase directly. AWS takes a 12% service fee on proceeds. Constraints: only Standard RIs can be sold (not Convertible); the RI must have been active for at least 30 days; minimum listing price is $0.10/month.
Convertible RI Exchange: instead of selling, Convertible RI owners can exchange their RI for a different family, size, OS, or tenancy as long as the new RI has equal or greater value. Example: exchange a c5.2xlarge Convertible RI for a c6g.2xlarge (Graviton) Convertible RI. If the new RI has a higher list price, you pay the difference (prorated for the remaining term). The exchange preserves the original term end date. You can exchange into multiple smaller RIs as long as the total value equals or exceeds the original. Savings Plans as a simpler alternative: Savings Plans commit in dollar terms and automatically apply to any matching compute, eliminating the need for RI Marketplace or exchanges. AWS recommends new purchase commitments use Savings Plans rather than RIs for most use cases.
How do you design a highly available, fault-tolerant EC2 architecture? Advanced
A production-grade highly available EC2 architecture requires redundancy at every layer:
Multi-AZ deployment: run instances in at least 2 Availability Zones within a region. AZs are physically isolated data centers with independent power, cooling, and networking. An outage in one AZ (which occurs several times per year) does not affect instances in another AZ. Auto Scaling Group spanning multiple AZs: the ASG automatically distributes instances across AZs and replaces unhealthy instances. Set minimum = 2 (one per AZ), so at least one instance survives any single AZ failure. Elastic Load Balancer: distributes traffic across instances in all AZs. When one AZ fails, the ELB automatically routes traffic to the remaining healthy instances. Enable cross-zone load balancing so traffic is distributed evenly across all instances regardless of which AZ they are in. Stateless application design: store session state in ElastiCache or DynamoDB (not on instance local disk) so any instance can serve any request. Store uploaded files in S3 (not on EBS). This ensures instances are fully interchangeable and termination of any instance causes no data loss. Database layer: use RDS Multi-AZ (synchronous standby in another AZ) or Aurora (6-way replication across 3 AZs) rather than a database on EC2 with manual replication. Health checks: ASG health checks must verify application-level health (not just EC2 status), so instances serving errors are replaced. Chaos testing: regularly use AWS FIS to simulate AZ failures and verify the architecture handles them correctly before a real outage occurs.
What are EC2 networking performance best practices? Advanced
Getting maximum network performance from EC2 requires configuring the right instance types and networking features:
Placement Groups: use Cluster Placement Groups for EC2 instances that communicate heavily with each other (HPC, ML training, Spark). This reduces inter-instance network latency from ~1ms to ~200 microseconds and maximizes bandwidth. Enhanced Networking / ENA: ensure Enhanced Networking is enabled (check with ethtool -i eth0 – driver should be “ena”). It is enabled by default on all current Nitro-based instances with supported AMIs. Jumbo frames: within a VPC, enable 9001 MTU jumbo frames to increase packet payload and reduce CPU overhead per byte transferred. Use ip link set eth0 mtu 9001. Only applicable within the same region VPC (cross-region and internet traffic max at 1500 MTU). Instance bandwidth ceiling: larger instances have proportionally higher network bandwidth. When you need to transfer large amounts of data (backups, ML training datasets), use a single large instance rather than many small instances – the bandwidth limitation scales with instance size. A c5n.18xlarge delivers 100 Gbps network bandwidth vs 1.5 Gbps for a t3.medium. EBS-optimized instances: all current Nitro instances are EBS-optimized by default – EBS I/O uses a dedicated network path so it does not compete with instance network traffic. Multiple ENIs: adding ENIs does not increase total bandwidth – a c5.2xlarge with 2 ENIs has the same total bandwidth as with 1 ENI, just split across two interfaces.
How do you secure EC2 instances following AWS security best practices? Intermediate
EC2 security requires defense in depth – multiple overlapping controls so that a failure in one layer does not compromise the instance:
Network layer: (1) Keep instances in private subnets (no direct internet access). Place them behind an ALB in a public subnet. (2) Apply security groups with the principle of least privilege – allow only the specific ports and IP ranges needed. (3) Enable VPC Flow Logs and review for anomalous traffic. (4) Use AWS WAF on the ALB to block common web exploits (SQL injection, XSS). Access layer: (5) Disable SSH key pair distribution – use SSM Session Manager instead. If SSH is required, use EC2 Instance Connect (time-limited keys, IAM-controlled). (6) Never use root account credentials. (7) Enforce IMDSv2 (http-tokens=required) on all instances. OS layer: (8) Use EC2 Image Builder to maintain a hardened AMI (CIS Level 1 benchmarks, minimal package installation). (9) Enable automatic patching via SSM Patch Manager. (10) Run antimalware (CrowdStrike, GuardDuty findings). Application layer: (11) Attach IAM roles with minimum required permissions (not AdministratorAccess). (12) Use Secrets Manager or Parameter Store for credentials – never embed in user data or environment variables. (13) Enable CloudTrail API logging for all EC2 operations. Detection layer: (14) Enable GuardDuty – it detects EC2 behavioral anomalies (cryptocurrency mining, unusual network patterns, compromised IAM credentials from EC2). (15) Enable Amazon Inspector – continuously scans for CVEs in running instances. (16) Use AWS Config rules to enforce compliance (ec2-imdsv2-check, ec2-instance-no-public-ip, restricted-ssh).
What is EC2 Graviton and when should you use it? Intermediate
AWS Graviton is Amazon’s custom ARM-based processor for EC2 instances, offering better price-performance than equivalent Intel (Intel Xeon) or AMD (EPYC) x86 instances. Graviton3 (used in C7g, M7g, R7g, and other 7th-generation “g” instances) delivers up to 25% better performance than comparable x86 instances at the same price, or up to 40% better price-performance. Graviton3E (used in Hpc7g) is optimized for HPC workloads.
When to use Graviton: any workload running on a Linux-based OS with software that can be compiled for ARM64. This includes: modern web application stacks (Node.js, Python, Java, Go, PHP, Ruby all run natively on ARM64), containerized workloads (Docker images must have an arm64 variant – most official images from public registries do), and open-source databases (MySQL, PostgreSQL, Redis all run on ARM64). When NOT to use Graviton: proprietary x86-only software (some licensed databases, vendor-specific monitoring agents), Windows Server (AWS does not offer Windows on Graviton), and applications with x86-specific assembly optimizations. Migration approach: replace instance type (e.g., m6i → m7g) and verify application functionality. Most containerized workloads and modern language runtimes work without code changes. Build Docker images for both amd64 and arm64 using multi-platform builds (docker buildx build --platform linux/amd64,linux/arm64). AWS Graviton adoption recommendation: new greenfield workloads should default to Graviton unless there is a specific reason not to. Graviton instances have the same pricing model as equivalent x86 instances (On-Demand, Spot, Savings Plans) and are available in all major regions.
How do you handle EC2 key pair loss and key rotation? Intermediate
If the private key for an EC2 instance’s key pair is lost, you cannot use the traditional SSH method to regain access. The public key stored in ~/.ssh/authorized_keys on the instance is the lock; losing the private key means you cannot open that lock. However, several recovery methods exist:
Method 1 – SSM Session Manager (preferred, no downtime): if SSM Agent is running on the instance, connect via Session Manager. Then add a new public key to ~/.ssh/authorized_keys, or change the instance to use a new key pair. Method 2 – Systems Manager Run Command: use SSM Run Command with the AWS-RunShellScript document to echo a new public key into authorized_keys: aws ssm send-command --instance-ids i-0abc123 --document-name AWS-RunShellScript --parameters commands=["echo 'ssh-rsa AAAA...' >> /home/ec2-user/.ssh/authorized_keys"]. Method 3 – EBS volume detach/reattach: stop the instance, detach the root EBS volume, attach to a rescue instance, mount and edit /home/ec2-user/.ssh/authorized_keys (or /root/.ssh/authorized_keys) to add the new public key, detach from rescue instance, reattach to original, start original instance. Key rotation best practice: the premise of key rotation does not apply when using SSM Session Manager (no SSH keys needed) or EC2 Instance Connect (keys are ephemeral, 60-second lifetime). For organizations still using SSH key pairs: generate new key pairs annually or when a team member leaves, use AWS Systems Manager to push the new public key to all affected instances in a single Run Command job, revoke the old key pair in EC2. Never reuse key pairs across environments (prod key pair should be different from dev key pair).
What is the difference between vertical scaling and horizontal scaling on EC2? Beginner
Vertical scaling (scaling up/down): changing the instance type to a larger or smaller size. Example: upgrading from a t3.medium (2 vCPU, 4 GB) to an m5.4xlarge (16 vCPU, 64 GB) to handle increased load. Requires stopping the instance (downtime), changing the instance type, and restarting. The instance retains its instance ID, EBS volumes, security groups, and IAM role. Vertical scaling is limited by the maximum instance size available (currently u-24tb1.metal for memory, c5.24xlarge for CPU-optimized).
Horizontal scaling (scaling out/in): adding or removing instances of the same size. Example: running 4 m5.large instances instead of 1 m5.4xlarge. Requires a load balancer to distribute traffic. Auto Scaling Groups automate horizontal scaling. Horizontal scaling is theoretically unlimited – you can add as many instances as your EC2 quotas allow. Advantages of horizontal over vertical: no downtime (add instances while existing ones keep running); more fault-tolerant (if one instance fails, others handle the load); can scale incrementally (add 1 instance at a time rather than doubling size); cheaper at scale (many smaller instances can be Spot-mixed, while fewer large instances are harder to replace with Spot). When vertical makes sense: single-threaded applications that cannot distribute work across multiple processes (certain database workloads), legacy applications not designed for horizontal distribution, or situations where the overhead of distributed systems (network latency, distributed state) is worse than vertical limits. AWS best practice: architect for horizontal scaling from the start. This aligns with Auto Scaling, Spot Instances, and higher availability.
How does EC2 handle IPv6 and when do you need it? Intermediate
IPv6 support on EC2 allows instances to have both IPv4 and IPv6 addresses (dual-stack) or IPv6-only addresses. AWS has been incrementally expanding IPv6 support to reduce dependence on the increasingly scarce IPv4 address space (hence the new $0.005/hour charge for public IPv4 addresses starting February 2024).
IPv6 on EC2: each EC2 instance in a dual-stack subnet can have one or more IPv6 addresses. IPv6 addresses are globally unique (no NAT required), so all IPv6-enabled instances have direct internet connectivity through an Internet Gateway without needing a public IPv4 address. IPv6-only EC2 (2023): launching an instance in an IPv6-only subnet means it has no public or private IPv4 address at all, only an IPv6 address. Reduces costs (no public IPv4 charge) and simplifies network architecture. Requires software that supports IPv6 (modern operating systems, applications). Egress-only Internet Gateway: allows outbound IPv6 traffic from instances to the internet while blocking inbound connections (similar to NAT Gateway for IPv4, but for IPv6). Use cases requiring IPv6: mobile applications (mobile carriers use IPv6 natively), compliance with government mandates requiring IPv6 (US federal government requires IPv6), reducing public IPv4 costs at scale, and future-proofing architectures. Migration consideration: not all software supports IPv6. Audit application code, configuration, and third-party dependencies before moving to IPv6-only. The AWS SDK, CLI, and most AWS services support IPv6.
What are common EC2 interview scenario questions and answers? Advanced
Scenario: “An EC2 instance suddenly became unreachable. What do you do?” Check the EC2 system and instance status checks. If system check failed, stop/start to move to new hardware. If instance check failed, check Serial Console for OS-level issue (kernel panic, full disk). Check security group rules for accidental deletion. Check route table for removed Internet Gateway route. Use SSM Session Manager if SSH is blocked.
Scenario: “Application response time increased 5x. How do you investigate?” Check CloudWatch metrics: CPUUtilization (CPU saturation), NetworkIn/Out (bandwidth saturation), EBSReadOps/WriteOps and VolumeQueueLength (EBS I/O bottleneck). Check application-level metrics (database query times, cache hit rates). Check if a recent deployment changed code. Check if the instance type is T-series and check CPUCreditBalance – if exhausted, this causes CPU throttling. Use Systems Manager Session Manager to run top, iostat, free -m on the instance.
Scenario: “You need to run a 48-hour GPU training job at minimum cost. How?” Use P3 or P4 Spot Instances (up to 70-90% discount vs On-Demand). Enable checkpointing to S3 every 30 minutes. Use Spot Fleet with capacityOptimized strategy across multiple instance types and AZs to minimize interruption probability. If interrupted, restart from the last checkpoint. Use AWS Batch to manage the job lifecycle and checkpoint/restart automatically. A 48-hour p3.2xlarge job costs ~$21 On-Demand vs ~$3-5 on Spot – an order of magnitude savings.
Scenario: “Design cost-efficient compute for an e-commerce site with Black Friday traffic spikes.” Baseline: 4 m6i.large On-Demand instances covered by Savings Plans (handles normal traffic). Auto Scaling: scale out using Spot instances (m5.large, m5a.large, m4.large) during traffic spikes with capacityOptimized strategy. Pre-scheduled scaling: increase desired capacity the morning of Black Friday before traffic arrives. CloudFront: cache static assets (product images, CSS, JavaScript) to reduce EC2 load by 60-80%. Database: RDS Aurora read replicas to handle increased read load. Expected cost: ~$200/month baseline vs $2,000-3,000 if using On-Demand for peak capacity 24/7.
How do EC2 placement groups interact with Auto Scaling? Advanced
Placement Groups can be associated with Launch Templates and used with Auto Scaling Groups, but there are important constraints and trade-offs to understand:
Cluster Placement Group + ASG: all instances in the ASG are placed in the same rack within one AZ. Provides lowest latency but terrible availability – a rack failure takes down all instances simultaneously. The ASG can only scale within the single AZ where the cluster placement group exists. If the Cluster Placement Group runs out of capacity for a specific instance type (capacity error: “InsufficientInstanceCapacity”), the ASG cannot launch new instances. Mitigation: use a Spot Fleet with multiple instance types in the placement group to increase capacity pool diversity. Spread Placement Group + ASG: hard limit of 7 instances per AZ. If the ASG needs to scale beyond 7 instances per AZ, launches outside the placement group fail. Spread placement groups are suitable only for small, critical ASGs (primary/standby database pairs, key infrastructure services). Partition Placement Group + ASG: supports large-scale deployments. Instances are distributed across partitions (each partition = one fault domain). ASG does not automatically assign instances to specific partitions – instances land on any available partition. For applications requiring explicit partition assignment (Kafka, Cassandra), use partition placement group with manual instance launching, not an ASG. Best practice: for most web application ASGs, do not use placement groups. Let the ASG’s multi-AZ distribution provide fault tolerance. Use placement groups only for specific performance requirements (HPC cluster → Cluster; critical small clusters → Spread) where the trade-offs are acceptable.
What are the most important EC2 CloudWatch metrics to monitor in production? Intermediate
EC2 provides a standard set of CloudWatch metrics at 5-minute intervals (1-minute with detailed monitoring enabled). The critical metrics to monitor and alert on:
Compute: CPUUtilization – alert at 85% sustained for 10 minutes (scale out trigger); CPUCreditBalance (T-series only) – alert at 20 credits to prevent throttling; CPUSurplusCreditsCharged (T-series Unlimited) – cost visibility. Memory: NOT included in standard EC2 metrics. Requires installing CloudWatch Agent and configuring it to collect mem_used_percent. Alert at 85% memory used. Memory pressure is a common cause of slow application response not visible in CPU metrics. Network: NetworkIn/NetworkOut – alert if approaching instance bandwidth limits; NetworkPacketsIn/Out – high PPS (packets per second) approaching limits. EBS: VolumeQueueLength (alert > 1 sustained) – I/O requests queuing means the volume cannot keep up; EBSReadOps, EBSWriteOps, EBSReadBytes, EBSWriteBytes – throughput visibility; EBSIOBalance%, EBSByteBalance% (gp2 burst buckets) – alert if approaching 0%. Status checks: StatusCheckFailed_System, StatusCheckFailed_Instance – alert immediately and trigger auto-recovery. ASG metrics: GroupDesiredCapacity, GroupInServiceInstances, GroupPendingInstances – ensure desired = in-service (pending instances that never become in-service indicate a launch failure). Application-level metrics: use CloudWatch Agent or third-party APM (DataDog, New Relic) to capture request latency, error rate, database connection pool size, garbage collection pause time – these are the metrics that actually indicate application health, which pure EC2 metrics cannot show.
Frequently Asked Questions – AWS EC2 Interview Questions
What is the difference between stopping and terminating an EC2 instance?
Stopping an EC2 instance shuts down the OS and stops compute billing, but preserves the EBS root volume and all attached EBS data volumes. The instance can be restarted later and retains its instance ID, EBS volumes, Elastic IP (if attached), and IAM role. Stopping and starting moves the instance to new underlying hardware. Terminating permanently deletes the EC2 instance. By default, the root EBS volume is deleted on termination (DeleteOnTermination flag), but you can change this setting to preserve the root volume. Additional EBS volumes attached to the instance are not deleted on termination by default. Once terminated, the instance ID is retired and cannot be recovered. Use stop for instances you plan to restart later (development servers, databases between test runs). Use terminate only when you permanently no longer need the instance.
How many EC2 instances can you run in an AWS account?
EC2 does not enforce a hard limit on instance count – it enforces limits based on vCPUs per instance family per region. The default limit for On-Demand Standard instances (A, C, D, H, I, M, R, T, Z families) is 32 vCPUs per region. For a t3.micro (2 vCPUs), this allows 16 instances by default. For an m5.4xlarge (16 vCPUs), this allows 2 instances. You can request quota increases via the Service Quotas console – most increases are approved within 24-48 hours. Large production accounts typically have vCPU limits in the thousands. Spot Instance limits are separate (default 640 vCPUs). Note that the 32 vCPU default limit is per region, so you can run 32 vCPUs in us-east-1 AND 32 vCPUs in eu-west-1 simultaneously with default limits.
What is the maximum EBS volume size you can attach to an EC2 instance?
The maximum size for a single EBS volume is 64 TB (65,536 GB) for gp2, gp3, io1, io2, and st1 volume types. sc1 Cold HDD volumes also support up to 64 TB. A single EC2 instance can have multiple EBS volumes attached (up to 28 EBS volumes on most current Nitro-based instances), giving a theoretical maximum of over 1 PB of EBS storage per instance. However, the amount of data you can practically use is also limited by the file system – most Linux file systems support volumes up to 2 EB (ext4) or effectively unlimited (XFS). For storage needs exceeding a single EBS volume, use EFS (which scales to petabytes automatically) or RAID 0 (stripe multiple EBS volumes together for higher aggregate IOPS and capacity).
What is the difference between a public IP and an Elastic IP for EC2?
A public IP is dynamically assigned from AWS’s IP pool when an EC2 instance in a public subnet starts. It changes every time the instance stops and starts, making it unsuitable for DNS records or firewall whitelists that require a stable IP. It is released when the instance stops. An Elastic IP is a static public IPv4 address that you allocate to your AWS account and associate with an EC2 instance. It persists through stop/start cycles and can be remapped to a different instance in seconds. Both now cost $0.005/hour when associated with a running instance (since February 2024). Elastic IPs also charge $0.005/hour when allocated but not associated with a running instance. Use Elastic IP when DNS records or external systems require a stable IP. Use a load balancer DNS name instead of Elastic IPs where possible – ALBs have stable DNS names even as underlying IPs change.
Can an EC2 instance be in multiple security groups?
Yes, an EC2 instance (or more precisely, an Elastic Network Interface) can have up to 5 security groups associated with it simultaneously. All rules across all associated security groups are evaluated together – AWS collects all inbound and outbound rules from all security groups and applies the union. If any one security group allows a specific type of traffic, it is allowed regardless of what other security groups say (security groups are additive, not restrictive between themselves). Multiple security groups are useful for layered policy management: one security group defines the base rules for all instances (allow outbound HTTPS to 0.0.0.0/0 for AWS API calls), a second defines application-specific rules (allow inbound TCP 8080 from the load balancer security group), and a third defines management access rules (allow TCP 443 from the corporate VPN). This approach allows updating rules in one security group to affect all instances that share it, rather than updating each instance’s security group individually.
For further reading on AWS EC2, consult the official AWS EC2 documentation and the EC2 instance types page. For related AWS services, see our guides on AWS interview questions for freshers and AWS VPC interview questions. You may also find our AWS IAM interview questions and AWS S3 interview questions helpful for your preparation.